“`html
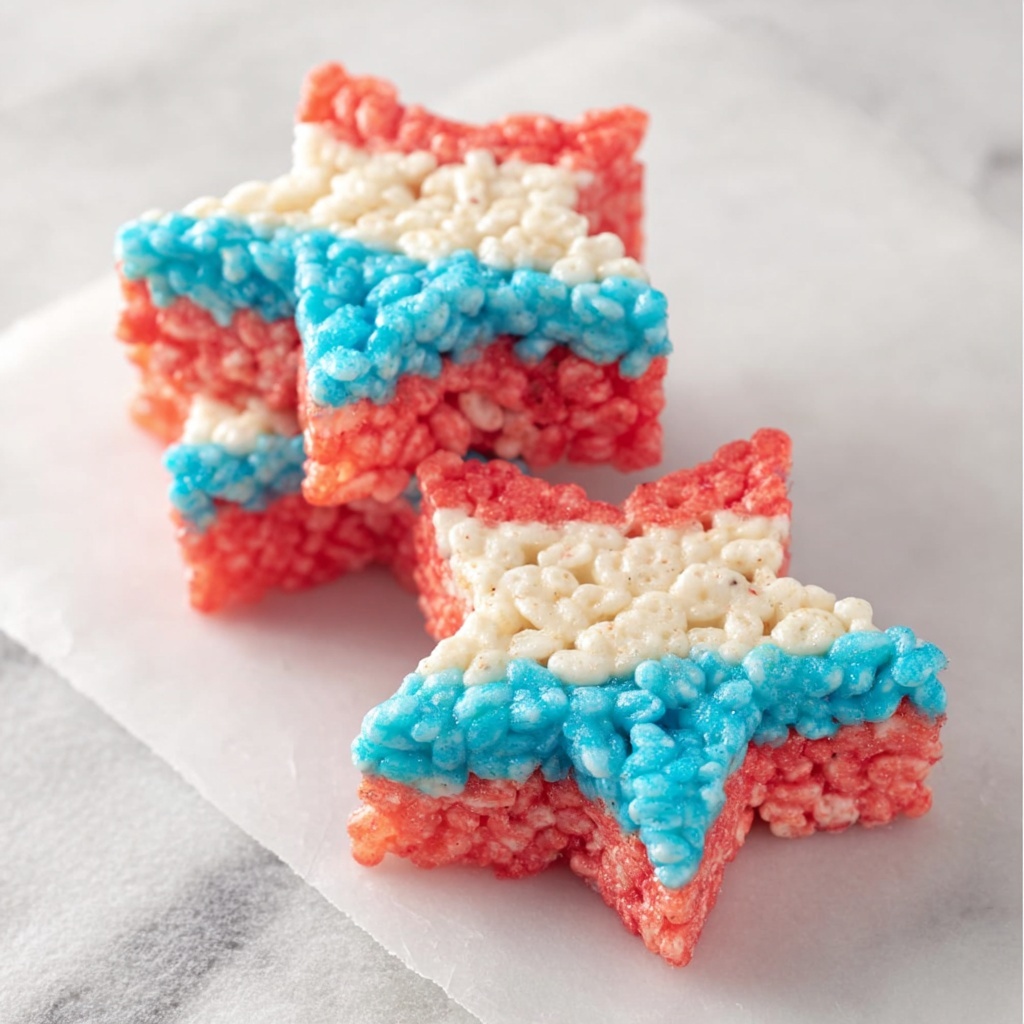
If you’re looking to bring some festive joy to your 4th of July celebrations, nothing hits the spot quite like the vibrant and delicious 4th of July Red, White & Blue Rice Krispie Treats Recipe. This iconic dessert takes the beloved childhood classic and transforms it into a dazzling tri-color treat that’s as fun to make as it is to eat. With perfectly gooey marshmallows, crispy cereal, and patriotic hues, these layered treats are guaranteed to dazzle your guests and add a sweet touch to your Independence Day festivities.
Ingredients You’ll Need
This recipe keeps things delightfully simple but impactful. Each ingredient plays a special role, whether it’s creating that iconic chewy texture, delivering bursts of color, or adding hints of vanilla that tie it all together perfectly.
- Butter (¾ cup, divided): Melts smoothly to help everything stick together and adds a rich buttery flavor that balances the sweetness.
- Mini marshmallows (15 cups, divided): The heart of the treat, they melt into that irresistible goo that binds the cereal.
- Crispy rice cereal (12 cups, divided): Gives the treats their signature crunch and lightness while soaking up the marshmallow goodness.
- Clear vanilla extract (1 ½ teaspoons, divided): Enhances the flavor with a subtle, comforting note without coloring the layers.
- Red and blue food coloring (8-9 red drops, 6 blue): Adds the patriotic pop that transforms ordinary treats into a festive masterpiece.
How to Make 4th of July Red, White & Blue Rice Krispie Treats Recipe
Step 1: Prepare Your Pan
Start by lining a 9×13-inch pan with parchment paper, then lightly spray it with cooking spray. This will ensure the treats release easily without sticking, making clean-up a breeze and keeping your layers neat.
Step 2: Create the Red Layer
In a large pot over medium-low heat, melt ¼ cup of butter. Stir in 5 cups of mini marshmallows and keep stirring until they’re nearly melted and gooey. Reduce the heat to low, then mix in ½ teaspoon of vanilla and the red food coloring in small increments until you achieve a vibrant, festive red. Remove from heat, fold in 4 cups of crispy rice cereal until thoroughly coated, and press this mixture evenly into the prepared pan using a buttered spoon to smooth it out and pack it firmly.
Step 3: Make the White Layer
Repeat the melting and marshmallow process with another ¼ cup of butter and 5 cups of marshmallows, adding ½ teaspoon of vanilla but no food coloring this time. Stir in 4 cups more of cereal, then scatter this creamy white mixture evenly atop the red layer. Press down gently and smooth to create a clean, crisp contrast.
Step 4: Add the Blue Layer
For the final touch, melt the remaining ¼ cup butter and 5 cups marshmallows again, mixing in ½ teaspoon vanilla plus the blue food coloring until a beautiful navy hue develops. Fold in the last 4 cups of cereal and firmly press this blue mixture over the white layer, smoothing it out carefully to build those iconic patriotic stripes.
Step 5: Cool and Set
Let the layered treat cool completely at room temperature. This step is crucial for getting those clean-cut layers when it’s time to slice and serve.
Step 6: Remove and Cut into Stars
Once cooled, gently lift the layered Rice Krispie treats from the pan using the parchment paper. If the edges are stuck, slide a knife around the perimeter to loosen them. Then, using a star-shaped cookie cutter, cut the treats into festive stars. If the cutter doesn’t cut all the way through, press to make an indent and finish the cut with a knife following the stencil.
How to Serve 4th of July Red, White & Blue Rice Krispie Treats Recipe
Garnishes
While the treats themselves are stunning, you can elevate their festive look by dusting them with some edible glitter or sprinkling tiny white nonpareils to add a bit of sparkle. A light drizzle of white chocolate can also add a luxurious touch and make these treats even more irresistible.
Side Dishes
These treats pair beautifully with other classic 4th of July fare like freshly sliced watermelon, a colorful fruit salad, or even a refreshing lemonade with raspberries and blueberries. The sweet crunch of these Rice Krispie stars contrasts perfectly with juicy, fresh fruits and chilled beverages.
Creative Ways to Present
Arrange these stars on a bright red or blue platter for instant patriotic pride. For a fun party idea, stick star-shaped skewers into each treat and display them in a Mason jar filled with red, white, and blue decorative beads or sand. This makes them easy to grab and turns them into eye-catching edible centerpieces.
Make Ahead and Storage
Storing Leftovers
If you have any leftovers (which might be tough!), store them in an airtight container at room temperature. This keeps the treats fresh and chewy for up to three days without losing their lovely texture or flavor.
Freezing
Freezing these Rice Krispie treats is absolutely possible and convenient. Wrap each cut star tightly in plastic wrap and place them in a freezer bag or airtight container. They maintain their quality for up to one month and thaw quickly when you’re ready to serve.
Reheating
These treats are best enjoyed fresh or at room temperature. If you prefer them softer after freezing, simply let them come to room temperature naturally. Avoid microwaving as it can make them overly sticky or gummy.
FAQs
Can I use regular-sized marshmallows instead of mini marshmallows?
Yes! Regular marshmallows work just fine but may take a little longer to melt. Cut them into smaller pieces to speed up the melting process and help the mixture blend evenly with the cereal.
Is there a way to avoid using food coloring?
If you prefer natural colors, you can experiment with beet juice powder or natural berry powders for red and spirulina powder for blue, although the colors might be less vibrant and affect the taste slightly.
Can I make this recipe gluten-free?
Absolutely! Just make sure to use a certified gluten-free crispy rice cereal. All the other ingredients are naturally gluten-free, so it’s an easy switch.
How do I prevent the treats from sticking to my spoon and pan?
Greasing your stirring spoon and the pan with butter or non-stick spray helps prevent sticking. You can also lightly spray your hands before pressing down the mixture to avoid stickiness.
Can I double or triple this recipe for larger crowds?
Yes, this recipe scales up very well! Just use a larger pan or multiple pans to maintain the defined layers, and be sure to prepare each layer carefully in batches to keep the colors and textures distinct.
Final Thoughts
There’s something truly magical about the 4th of July Red, White & Blue Rice Krispie Treats Recipe—it’s nostalgia wrapped in colorful layers that instantly bring smiles and festive cheer to any celebration. Whether you’re making them with kids or whipping them up for a summer party, the process is as fun as the results. Give this recipe a try and watch how it becomes a new holiday favorite in your household.
“`
Print
4th of July Red, White & Blue Rice Krispie Treats Recipe
- Prep Time: 25 minutes
- Cook Time: 15 minutes
- Total Time: 40 minutes
- Yield: 8 servings
- Category: Dessert
- Method: Stovetop
- Cuisine: American
- Diet: Vegetarian
Description
Celebrate the 4th of July with these festive Red, White, and Blue Rice Krispie Treats. Layers of colorful marshmallow and crispy rice cereal create a patriotic dessert that’s perfect for summer gatherings. Easy to make and fun to eat, these treats combine classic ingredients with a vibrant twist.
Ingredients
Butter
- ¾ cup butter, divided
Marshmallows
- 15 cups mini marshmallows, divided
Crispy Rice Cereal
- 12 cups crispy rice cereal, divided
Flavoring and Coloring
- 1 ½ teaspoons clear vanilla extract, divided
- Red food coloring, 8-9 drops
- Blue food coloring, 6 drops
Instructions
- Prepare Pan: Line a 9×13-inch pan with parchment paper and spray lightly with cooking spray to prevent sticking.
- Make Red Layer: In a large pot over medium-low heat, melt ¼ cup butter. Add 5 cups mini marshmallows and stir frequently until nearly melted. Reduce heat to low, add ½ teaspoon vanilla extract and red food coloring gradually until desired color is reached. Remove from heat and stir in 4 cups crispy rice cereal until coated. Press mixture firmly and evenly into the bottom of the prepared pan.
- Make White Layer: Repeat the melting process with another ¼ cup butter and 5 cups marshmallows without adding food coloring, keeping the mixture white. After melting, add ½ teaspoon vanilla extract and stir in another 4 cups cereal. Press this layer evenly over the red layer in the pan.
- Make Blue Layer: Repeat the same process again with the remaining ¼ cup butter, 5 cups marshmallows, and ½ teaspoon vanilla. Add blue food coloring (6 drops) until the mixture reaches the desired hue. Stir in the remaining 4 cups cereal and press firmly over the white layer to form the blue top layer.
- Cool: Let the layered treats cool completely at room temperature to set.
- Remove from Pan: Use a knife to loosen the edges, then lift the treats out using the parchment paper. Place on a cutting board.
- Cut Shapes: Using a star-shaped cookie cutter, cut the treats into stars. If the cutter doesn’t cut all the way through, use it as a stencil and finish cutting with a knife to fully separate the shapes.
Notes
- Use parchment paper and cooking spray to prevent sticking and make removal easier.
- Gradually add food coloring to achieve your preferred shade for red and blue layers.
- Press each layer firmly to ensure the treats hold together well.
- Allow treats to cool fully before cutting to maintain shape and prevent crumbling.
- If you don’t have a star cookie cutter, any festive shape or simple squares will work.

