
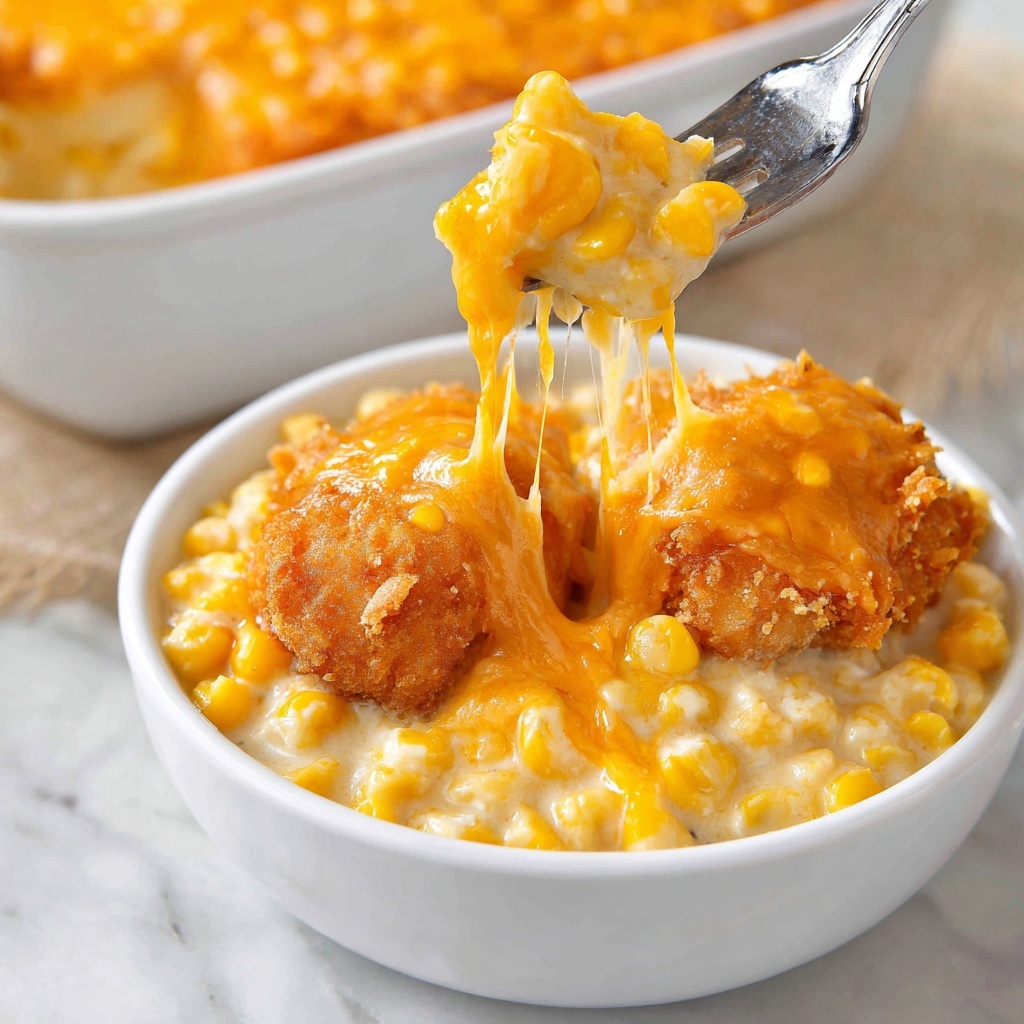
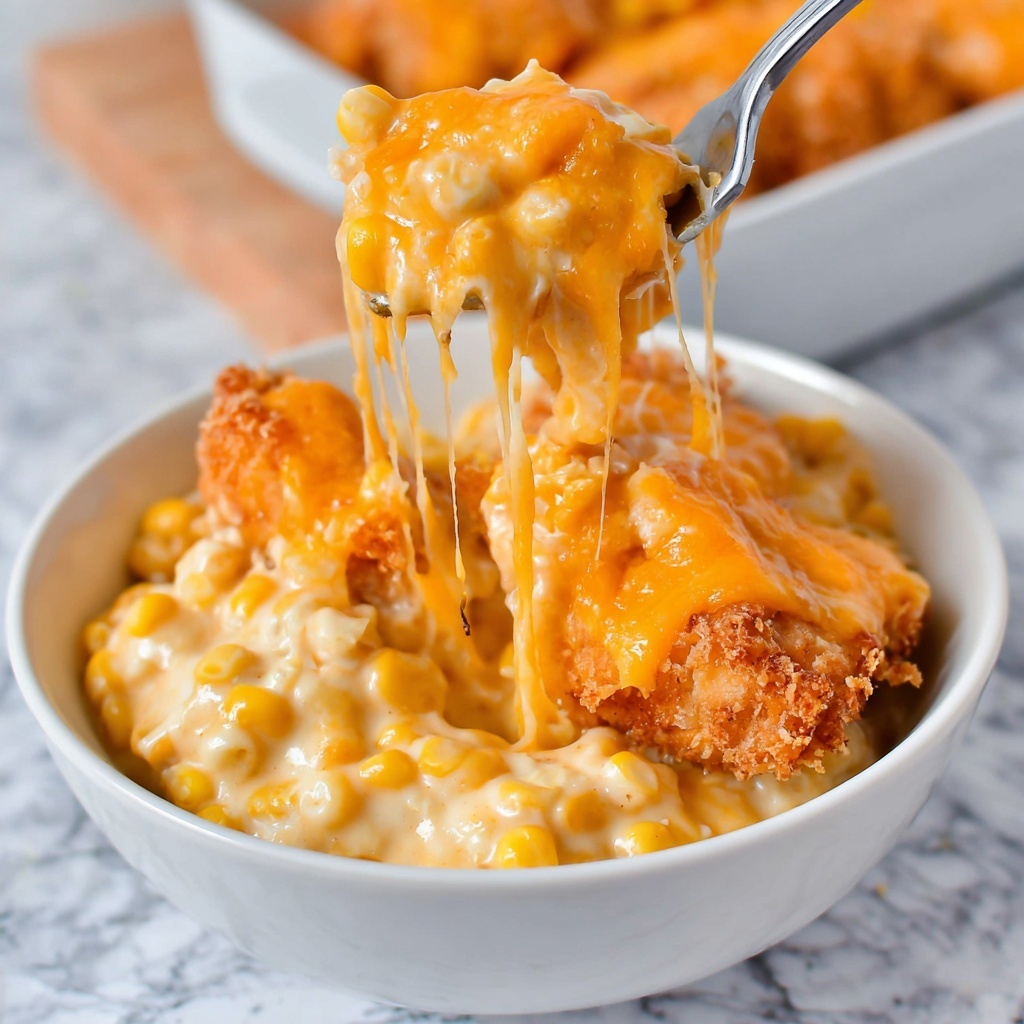
If you’ve ever craved the comforting, hearty flavors of classic Southern cooking, then you are going to absolutely fall in love with this Homemade KFC Bowls Recipe. It’s a delightful, layered casserole that brings together crispy chicken strips, creamy mashed potatoes, sweet corn, rich gravy, and melty cheddar cheese — everything you adore about your favorite fast-food bowl, but made right in your own kitchen. The beauty of this dish is not only how satisfyingly delicious it is, but also how accessible and easy it is to prepare, making it a perfect family meal or cozy dinner any day of the week.
Ingredients You’ll Need
Getting the flavors just right in this Homemade KFC Bowls Recipe is all about simple, familiar ingredients that balance perfectly together. Each item brings its own unique texture and taste — from the crispy chicken’s crunch to the creamy mashed potatoes and the savory gravy that ties it all together beautifully.
- Tyson Crispy Chicken Strips (8 strips, frozen): Convenient and perfect for that signature crunchy bite without the fuss of frying.
- Bob Evans Original Mashed Potatoes (24-ounce tub): Creamy and comforting, or you can use leftover homemade mashed potatoes if you prefer a fresh touch.
- Corn (1 cup, frozen or canned): Adds a naturally sweet pop and a subtle crunch to contrast the softness of the potatoes.
- Prepared Chicken or Turkey Gravy (1/2 cup): Rich and savory, the gravy adds depth and keeps everything moist and flavorful.
- Shredded Cheddar Cheese (3/4 cup): Melts perfectly over the top for that irresistible gooey finish.
How to Make Homemade KFC Bowls Recipe
Step 1: Bake the Chicken Strips
Preheat your oven to 400ºF and arrange the frozen Tyson Crispy Chicken Strips on a cookie sheet. Baking for about 18-20 minutes ensures they become hot and irresistibly crispy, which is essential to mimic that satisfying crunch in this Homemade KFC Bowls Recipe. If you’re using a different brand or type of chicken, just follow the package instructions for best results.
Step 2: Prepare the Baking Dish
Once the chicken is out of the oven, lower the temperature to 350ºF. Grab an 8×8-inch glass baking dish and coat it lightly with non-stick cooking spray to keep every layer from sticking and to ensure easy serving later on.
Step 3: Layer the Mashed Potatoes
Spread the entire tub of mashed potatoes evenly in the bottom of the baking dish. This creates the creamy, hearty foundation of the bowl and makes sure every bite has that silky potato goodness.
Step 4: Add the Corn
Next, spoon your corn over the mashed potatoes. The corn adds a burst of sweetness and a slightly different texture, which really complements the other layers beautifully.
Step 5: Drizzle the Gravy
Pour the prepared chicken or turkey gravy evenly over the corn. This layer is the key to bringing all the flavors together — the savory richness of the gravy seeps into the whole dish making it irresistibly flavorful and moist.
Step 6: Arrange the Chicken Strips
Place the crispy chicken strips on top of the gravy layer. Arrange them evenly so every serving gets a generous amount of that crispy, crunchy chicken everyone loves.
Step 7: Sprinkle the Cheese
Finish by sprinkling the shredded cheddar cheese over the chicken. This final layer will melt beautifully in the oven, creating a golden, bubbly topping that makes this Homemade KFC Bowls Recipe simply melt-in-your-mouth amazing.
Step 8: Bake the Casserole
Bake the entire dish at 350ºF for 10-12 minutes, just until the casserole is heated through and the cheese is perfectly melted. This final warm-up ensures all the layers meld together while preserving the textures that make this bowl so special.
How to Serve Homemade KFC Bowls Recipe
Garnishes
To elevate your Homemade KFC Bowls Recipe even further, consider garnishing with freshly chopped parsley or green onions. These fresh herbs add a lovely pop of color and a hint of brightness that contrast wonderfully with the rich, savory layers beneath.
Side Dishes
This bowl is quite filling on its own, but if you want to add some extra veggies, a crisp side salad or steamed green beans make a great choice. Their fresh crunch balances out the creamy, cheesy, and crispy elements of the bowl perfectly.
Creative Ways to Present
For a fun twist, serve your bowls in individual ramekins or mason jars, layering each ingredient separately before baking. This not only looks charming but allows everyone to see all the delicious layers that make this dish so crave-worthy!
Make Ahead and Storage
Storing Leftovers
If you have leftovers, place them in an airtight container and store in the refrigerator for up to 3 days. The flavors actually develop even more overnight, making the next day’s meal equally satisfying.
Freezing
To freeze, assemble the bowl but do not bake it yet. Wrap it tightly with plastic wrap and then aluminum foil before placing it in the freezer. It will keep well for up to 2 months. When you want to enjoy it, thaw overnight in the refrigerator before baking as directed.
Reheating
Reheat your leftover Homemade KFC Bowls Recipe in the oven at 350ºF until warmed through, about 15-20 minutes. This helps maintain the crispy texture of the chicken while melting the cheese to perfection. Avoid the microwave if possible, as it can make the chicken soggy.
FAQs
Can I use homemade mashed potatoes instead of store-bought?
Absolutely! Homemade mashed potatoes work wonderfully in this recipe and add a personal touch, but the store-bought versions save time and still deliver great flavor.
What can I substitute for Tyson Crispy Chicken Strips?
You can use any brand of frozen crispy chicken strips or even homemade fried chicken tenders. Just be sure to bake or fry them according to the instructions so they stay crispy.
Is there a vegetarian version of this dish?
You can make a vegetarian version by swapping out the chicken strips for crispy fried tofu or a plant-based chicken substitute and using vegetable gravy instead of chicken or turkey gravy.
Can I prepare this dish in advance?
Yes! You can assemble the bowl ahead of time, cover it tightly, and store it in the fridge for up to a day before baking. This makes it an excellent meal prep option.
How spicy is this Homemade KFC Bowls Recipe?
This recipe is mild and comforting with no added spices for heat, making it perfect for all ages. You can always add a dash of hot sauce or pepper flakes if you prefer a little kick.
Final Thoughts
Now that you know how to make this wonderfully cozy Homemade KFC Bowls Recipe, I hope you’re as excited as I am to get into the kitchen and whip up this savory, satisfying feast. It’s a fantastic way to bring a taste of a beloved classic right to your dinner table, with the comfort and love of home cooking. Trust me, once you try it, it’s going to become one of your go-to meals for family gatherings or weeknight dinners alike!
Print
Homemade KFC Bowls Recipe
- Prep Time: 10 minutes
- Cook Time: 30 minutes
- Total Time: 40 minutes
- Yield: 4 servings
- Category: Main Dish
- Method: Baking
- Cuisine: American
Description
This Homemade KFC Bowls recipe recreates the beloved flavors of the classic fast-food dish in a comforting casserole format. Featuring crispy baked chicken strips layered over creamy mashed potatoes, sweet corn, savory gravy, and melted cheddar cheese, this dish is perfect for a hearty family meal. The recipe uses Tyson Crispy Chicken Strips for convenience and comes together easily in the oven, delivering a delicious, satisfying bowl with minimal prep work.
Ingredients
Chicken
- 8 strips Tyson Crispy Chicken Strips (frozen)
Casserole Base
- 1 (24-ounce) tub Bob Evans Original mashed potatoes (or leftover homemade mashed potatoes)
- 1 cup corn (either thawed frozen corn or drained canned corn)
- 1/2 cup prepared chicken or turkey gravy (or leftover homemade gravy)
- 3/4 cup shredded cheddar cheese
Instructions
- Preheat and Bake Chicken: Preheat your oven to 400ºF. Arrange the frozen Tyson Crispy Chicken Strips on a cookie sheet in a single layer. Bake them at 400ºF for 18-20 minutes until they are heated through and crispy. If you’re using a different brand or type of chicken, follow the package instructions accordingly.
- Prepare the Baking Dish: Lower the oven temperature to 350ºF. Lightly coat an 8×8-inch glass baking dish with non-stick cooking spray to prevent sticking and make cleanup easier.
- Layer Mashed Potatoes: Evenly spread the mashed potatoes across the bottom of the prepared baking dish, creating the base layer of your casserole.
- Add Corn: Spoon the corn over the mashed potatoes, distributing it evenly to layer the flavors and add a touch of sweetness.
- Pour Gravy: Drizzle the chicken or turkey gravy over the corn layer, ensuring the casserole remains moist and flavorful.
- Arrange Chicken Strips: Place the baked crispy chicken strips over the gravy, spreading them evenly across the casserole to ensure each serving has a good portion of chicken.
- Add Cheese: Sprinkle the shredded cheddar cheese evenly on top of the chicken layer to melt during baking, adding richness and gooey texture.
- Bake the Casserole: Bake the assembled casserole at 350ºF for 10-12 minutes until everything is heated through and the cheddar cheese has melted beautifully.
Notes
- You can substitute Tyson Crispy Chicken Strips with any frozen breaded chicken strips, adjusting bake time as needed.
- Leftover homemade mashed potatoes and gravy can be used to enhance flavor and reduce prep time.
- For a spicier variation, add a sprinkle of cayenne pepper or hot sauce to the gravy before pouring.
- To make it a lower-fat option, use reduced-fat cheese and low-fat gravy.
- This dish can be prepared ahead of time by assembling all layers and baking just before serving.

