
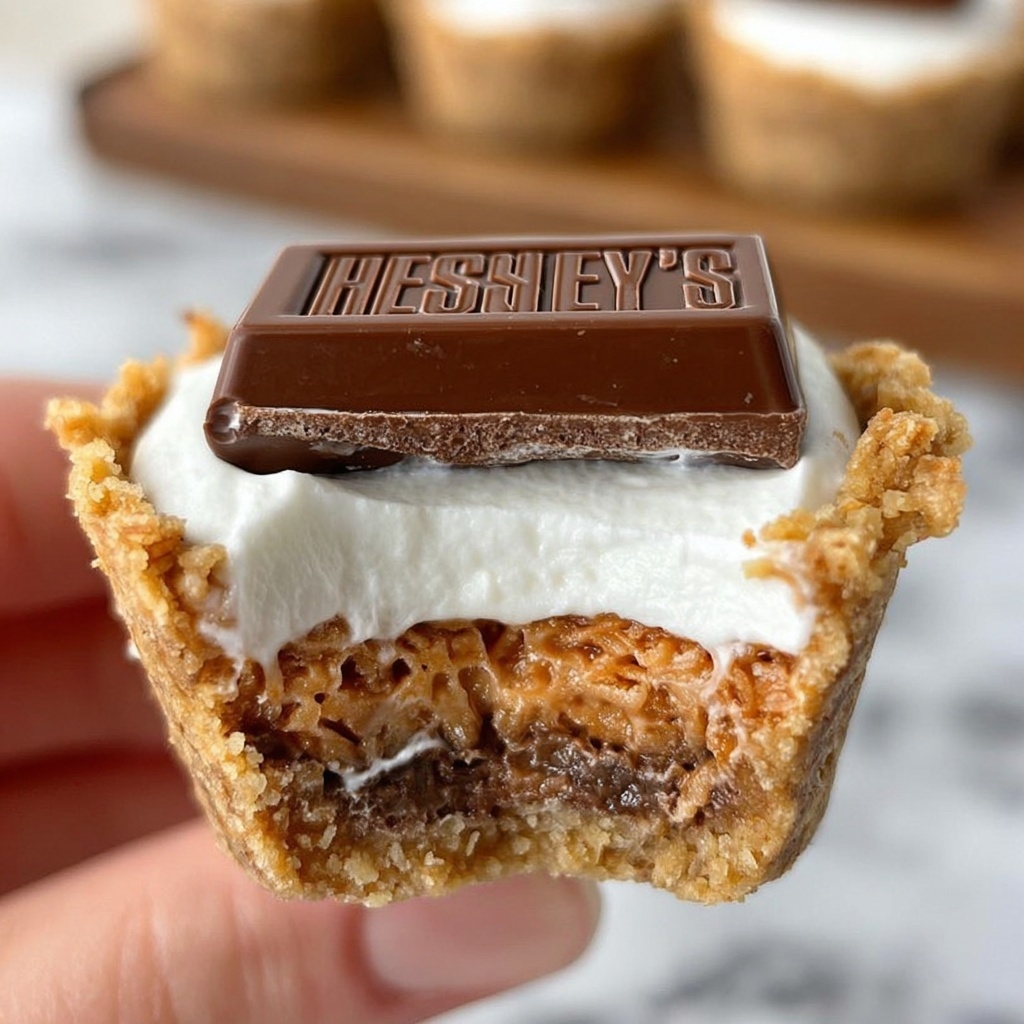
If you have a soft spot for campfire treats but want a fun twist to enjoy anytime, these cozy, bite-sized delights will become your go-to dessert. This S’mores Cookie Cups Recipe transforms the classic s’mores into perfectly chewy, crispy graham cracker cups filled with melty marshmallow and rich chocolate. It’s the ideal handheld indulgence that captures all the nostalgic charm of toasty campfire evenings right in your kitchen. Trust me, once you try this recipe, you’ll want to make it again and again for family gatherings, after-school snacks, or even a cute party dessert.
Ingredients You’ll Need
You only need a handful of simple ingredients to create these irresistible s’mores cookie cups. Each ingredient plays an important role in balancing flavor, texture, and that iconic s’mores look we all love.
- Graham cracker crumbs: Finely crushed for that signature crispy yet tender base.
- Powdered sugar: Adds a touch of sweetness and helps bind the crust together.
- Butter (melted): Makes the graham cracker mixture rich and helps it hold its cup shape.
- Regular-sized marshmallows: Cut in half, they toast beautifully for that perfect gooey center.
- Hershey’s chocolate bars: Divided into smaller pieces to melt perfectly atop each cup.
How to Make S’mores Cookie Cups Recipe
Step 1: Preheat your oven
Before you dive in, start by preheating your oven to 350 degrees Fahrenheit. This ensures the graham cracker crusts bake evenly and develop a lovely golden color.
Step 2: Mix the crust ingredients
In a small bowl, combine the finely crushed graham cracker crumbs, powdered sugar, and melted butter. Stir until everything is evenly moistened — this mixture will form the sturdy yet crumbly base of your cookie cups.
Step 3: Form the cookie cups
Grease a 24-cup mini muffin pan liberally with non-stick cooking spray to make sure your cookie cups release easily. Then, scoop the graham cracker mixture evenly into each cup. Gently press the crumbs along the bottom and up the sides to create the classic little cup shape that will hold our gooey fillings.
Step 4: Bake the crusts
Pop the tray into the oven and bake the graham cracker crusts for about 4 minutes. You want them to turn lightly golden and firm enough to hold together but still tender. This step develops their toasty flavor and lets the butter set.
Step 5: Prepare the marshmallows
While the crusts bake, cut each marshmallow in half horizontally. You’ll have exactly 24 rounded marshmallow halves that fit perfectly into those crispy cups, giving the iconic toasted marshmallow center.
Step 6: Broil to toast marshmallows
Switch your oven to broil and carefully place the marshmallow halves inside each graham cracker cup, cut side down. Slide the pan under the broiler just long enough for the marshmallows to puff up, soften, and toast golden-brown on top. This happens fast—keep your eyes on them to prevent burning!
Step 7: Add the chocolate and cool
Finally, top each toasted marshmallow with a small piece of Hershey’s chocolate. Let the cookie cups cool for about 15 minutes; the chocolate will gently melt from the residual heat, creating that classic s’mores melty texture. Use a butter knife to carefully lift the cups out of the pan, then get ready to enjoy.
How to Serve S’mores Cookie Cups Recipe
Garnishes
These cookie cups are beautiful on their own, but if you want to elevate your presentation, consider sprinkling a tiny pinch of flaky sea salt on top or drizzling a bit of melted chocolate over them once they’ve cooled. A light dusting of powdered sugar can also add a charming, festive look perfect for sharing.
Side Dishes
Because they’re sweet and rich, these s’mores cookie cups pair wonderfully with fresh fruit like strawberries or orange slices. If you’re serving them after dinner, a scoop of vanilla ice cream or a dollop of whipped cream on the side adds a creamy contrast that your guests will love.
Creative Ways to Present
For a fun twist at parties or gatherings, arrange the cookie cups on a wooden serving board with mini skewers to mimic the campfire experience. You might also serve them warm in small ramekins with extra marshmallows and chocolate nearby for guests to customize their own treats.
Make Ahead and Storage
Storing Leftovers
Once cooled completely, store leftover s’mores cookie cups in an airtight container at room temperature. They will stay fresh for up to 3 days, ready to satisfy any sweet craving without losing their texture or charm.
Freezing
If you want to keep them longer, these cookie cups freeze well. Place them in a single layer on a baking sheet and freeze until solid, then transfer to a freezer-safe container or bag. They’ll stay good for up to 1 month. Just be sure to thaw them before reheating.
Reheating
To bring back that warm, melty magic, reheat the cookie cups in a 300-degree Fahrenheit oven for about 5-7 minutes. Keep an eye on them to make sure the marshmallow doesn’t burn but gets soft and gooey again — just like fresh from the oven.
FAQs
Can I use mini marshmallows instead of regular ones?
While mini marshmallows melt faster, they won’t provide the same toasted effect or the perfect size for the cookie cups. Halving regular-sized marshmallows gives you a better, more satisfying gooey center.
What can I substitute if I don’t have Hershey’s chocolate bars?
Feel free to use any milk chocolate bar you like, or even chocolate chips. Just be sure the pieces are roughly the size of the cupcake tops to melt evenly over the marshmallow for that classic s’mores experience.
Do I need to use a mini muffin pan?
The mini muffin pan is ideal for shaping these into individual cookie cups, but if you don’t have one, you can try mini tart pans or even silicone molds with similar-sized cavities. Just be careful to press the crust firmly to hold shape.
Can I make these vegan or dairy-free?
Absolutely! Use vegan butter or coconut oil instead of butter, dairy-free chocolate, and vegan marshmallows to create a delicious plant-based version that still captures all the gooey goodness.
Is this recipe kid-friendly to make?
Definitely! The mixing, pressing crusts, and assembling steps are straightforward and fun for kids. Just supervise broiling since marshmallows toast quickly under high heat to keep things safe.
Final Thoughts
This S’mores Cookie Cups Recipe is such a delightful way to turn a beloved campfire treat into a charming, handheld dessert that anyone can enjoy year-round. I hope you have as much fun making and sharing these as I do. Once you’ve tried one, I guarantee you’ll be hooked on bringing that warm, gooey s’mores magic indoors anytime you want a truly special snack!
Print
S’mores Cookie Cups Recipe
- Prep Time: 10 minutes
- Cook Time: 8 minutes
- Total Time: 18 minutes
- Yield: 24 cookie cups
- Category: Dessert
- Method: Baking
- Cuisine: American
Description
These S’mores Cookie Cups put a delightful twist on the classic campfire treat by combining a crispy graham cracker crust with toasted marshmallows and melted chocolate in a convenient mini muffin-sized dessert. Perfect for parties or a cozy treat at home, they’re quick to make and irresistibly delicious.
Ingredients
Crust Ingredients
- 1 cup finely crushed graham cracker crumbs (about 7 whole graham crackers)
- 1/4 cup powdered sugar
- 6 tablespoons butter, melted
Filling and Topping
- 12 regular size marshmallows (cut in half to make 24 pieces)
- 2 full size Hershey’s Chocolate Bars, unwrapped and divided into 24 pieces
Instructions
- Preheat the Oven. Preheat your oven to 350°F (175°C) to prepare for baking the graham cracker crusts.
- Mix Graham Cracker Crust. In a small mixing bowl, combine the finely crushed graham cracker crumbs, powdered sugar, and melted butter until the mixture is evenly moistened and crumbly.
- Prepare Mini Muffin Pan. Lightly grease a 24-cup mini muffin pan with non-stick cooking spray to prevent sticking.
- Form the Crust Cups. Scoop the graham cracker crust mixture evenly into the 24 muffin cups. Gently press the crumbs into the bottom and sides of each cup to form sturdy little cups for the filling.
- Bake Crusts. Bake the mini graham cracker crusts at 350°F for 4 minutes or until they turn golden brown and set.
- Add Marshmallows. Cut each marshmallow in half to create 24 pieces. Place one marshmallow half into each baked graham cracker cup, positioning the cut side down.
- Broil the Marshmallows. Adjust the oven to broil. Place the pan under the broiler for 1-2 minutes until the marshmallows soften and start to toast. Watch closely as marshmallows can burn quickly.
- Add Chocolate and Cool. Top each toasted marshmallow with one piece of Hershey’s chocolate. Let the s’mores cookie cups cool for 15 minutes to set, then carefully lift them out with a butter knife.
Notes
- Watch the marshmallows carefully while broiling as they can burn very quickly.
- You can substitute Hershey’s chocolate with any milk or dark chocolate of your choice.
- Using a mini muffin pan ensures perfect bite-sized portions.
- Make sure to let the cups cool completely before removing to maintain their shape.


