
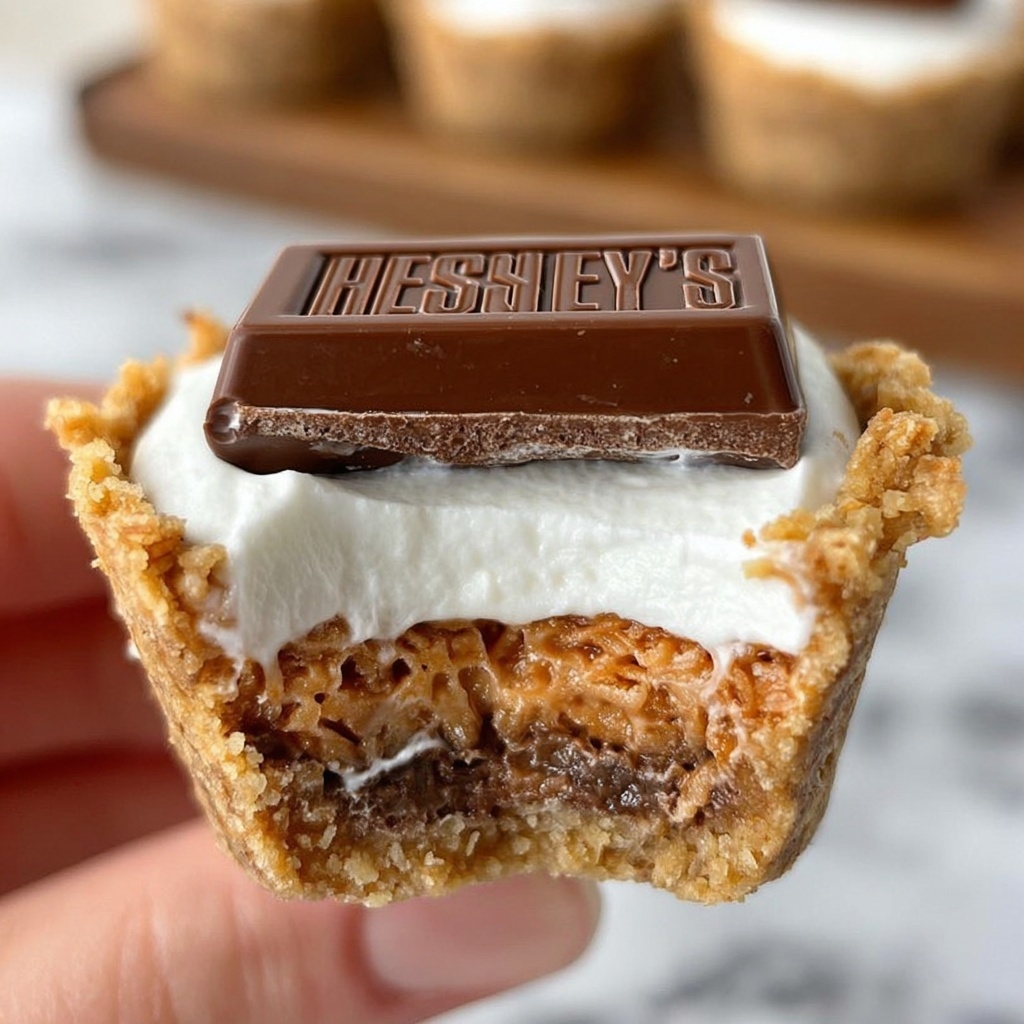
If you love the nostalgic taste of campfire treats but want a more convenient and adorable way to enjoy them, this S’mores Cookie Cups Recipe is going to be your new go-to dessert. Imagine bite-sized cups made from crispy graham cracker crusts, filled with perfectly toasted marshmallows and topped with melty chocolate pieces. They combine all the best parts of traditional s’mores into a neat little package that’s easy to make, fun to eat, and absolutely irresistible. Whether you’re serving them at a summer gathering or just craving something sweet, these cookie cups deliver the classic flavor with a delightful twist.
Ingredients You’ll Need
The magic of this S’mores Cookie Cups Recipe lies in its simple but carefully chosen ingredients. Each one plays a crucial role in building that iconic, irresistible flavor and texture that reminds us of campfires and good times. From the buttery graham cracker crust to the soft marshmallows and rich chocolate, every component contributes to making these treats so special.
- 1 cup finely crushed graham cracker crumbs: The crispy base that brings that classic s’mores crunch and flavor.
- 1/4 cup powdered sugar: Adds a subtle sweetness that balances the buttery crust perfectly.
- 6 tablespoons butter, melted: Binds the crumbs together and gives the crust a golden richness.
- 12 regular-sized marshmallows: When toasted, they bring the gooey softness that’s so essential to s’mores.
- 2 full size Hershey’s Chocolate Bars: Divided into 24 pieces, these melt beautifully on top for that signature chocolatey finish.
How to Make S’mores Cookie Cups Recipe
Step 1: Preheat the Oven
Before getting started, set your oven to 350°F. This will ensure it’s at the perfect temperature to bake the crusts just right, creating that golden, crispy base for your cookie cups.
Step 2: Mix the Crust Ingredients
Grab a small mixing bowl and combine the finely crushed graham cracker crumbs, powdered sugar, and melted butter. Mixing them together thoroughly will give you that perfect dough-like texture to form your cups.
Step 3: Form the Cookie Cups
Spray your 24-cup mini muffin pan with non-stick cooking spray to make removing the cookie cups easier later on. Then, scoop the graham cracker mixture into each cup and gently press it along the bottom and up the sides to shape neat little cups. This step shapes the foundation for your s’mores, so take a moment to get the edges nice and even.
Step 4: Bake the Graham Cracker Crusts
Pop the pan into your preheated oven and bake at 350°F for about 4 minutes. You’re looking for a light golden brown color, which means your crusts are crisp enough to hold the fillings without falling apart. Keep an eye on them to avoid over-baking.
Step 5: Prepare the Marshmallows
While the crusts are cooling just a little, cut each marshmallow in half to create 24 flat, round pieces. This makes them the perfect size to fit snugly inside each graham cracker cup with the cut side facing down, ensuring they toast evenly.
Step 6: Toast the Marshmallows
Switch your oven to broil. Arrange the pan under the broiler and toast the marshmallows for 1–2 minutes. Watch closely as marshmallows can brown and melt very fast, so you want them soft and lightly toasted, not burnt.
Step 7: Add Chocolate and Cool
Once toasted, immediately place one piece of Hershey’s chocolate on top of each marshmallow. Let the s’mores rest for about 15 minutes—this allows the chocolate to soften and the cookie cups to firm up a bit. When ready, gently use a butter knife to lift them from the pan.
How to Serve S’mores Cookie Cups Recipe
Garnishes
For a little extra flair, sprinkle some crushed graham cracker crumbs or mini chocolate chips over the top just before serving. A light dusting of powdered sugar can also add a pretty snowy effect that’s great for parties.
Side Dishes
Serve these cookie cups alongside a cold glass of milk or a steaming cup of hot chocolate to complete the cozy experience. They also pair wonderfully with fresh berries or a scoop of vanilla ice cream for a refreshing contrast.
Creative Ways to Present
Place your S’mores Cookie Cups Recipe treats on a rustic wooden board for a campfire vibe, or arrange them in colorful paper liners for birthday parties. You can also stack them onto a tiered dessert stand to create an eye-catching centerpiece that invites guests to dig in.
Make Ahead and Storage
Storing Leftovers
Store any leftover cookie cups in an airtight container at room temperature for up to two days. This keeps the crust crisp and the marshmallow fresh without losing that gooey texture we all crave.
Freezing
If you want to make these ahead of time, freeze the cooled cookie cups in a single layer on a baking sheet, then transfer to a freezer-safe container or bag. They keep well for up to 2 months and can be thawed at room temperature for an easy treat anytime.
Reheating
To bring back that just-made freshness, gently warm the cookie cups in a 300°F oven for 5 minutes. This softens the marshmallow slightly and melts the chocolate again without burning or drying out the crust.
FAQs
Can I use mini marshmallows instead of regular ones?
Mini marshmallows tend to melt too quickly and don’t create the same toasted texture. Using regular-sized marshmallows cut in half ensures a perfect toasted top and gooey center.
What type of chocolate works best?
Classic Hershey’s milk chocolate bars are perfect for this recipe because they melt smoothly and have a familiar, sweet flavor. You can experiment with dark, semi-sweet, or even flavored chocolates if you want something different.
Can I make these gluten-free?
Yes, by using gluten-free graham cracker crumbs or substitutes, you can enjoy this S’mores Cookie Cups Recipe without gluten. Just make sure the other ingredients are certified gluten-free as well.
Is it necessary to use a mini muffin pan?
The mini muffin pan helps create uniform, bite-sized cups that bake evenly. If you don’t have one, you can try small tart tins or silicone molds, but the baking time and ease of removal might vary.
How can I prevent marshmallows from burning under the broiler?
Keep a very close eye on the marshmallows while broiling. They toast quickly, so set a timer for 1 minute and watch continuously to catch them at the perfect golden stage before they burn.
Final Thoughts
This delightful S’mores Cookie Cups Recipe captures all the joy of a campfire treat in a perfectly portable form. It’s simple to make, delicious to eat, and sure to become a favorite for kids and adults alike. Give it a try the next time you want a cozy, sweet indulgence, and watch these little cups vanish from the plate faster than you can say “s’more please.” Happy baking and even happier snacking!
Print
S’mores Cookie Cups Recipe
- Prep Time: 10 minutes
- Cook Time: 8 minutes
- Total Time: 18 minutes
- Yield: 24 s’mores cookie cups
- Category: Dessert
- Method: Baking
- Cuisine: American
Description
These S’mores Cookie Cups are a delightful twist on the classic campfire treat, featuring a crunchy graham cracker crust, toasted marshmallows, and melty Hershey’s chocolate all baked into individual mini muffin-sized cups. Perfect for summer gatherings or whenever you need a nostalgic, gooey dessert that’s easy to make and fun to eat.
Ingredients
Graham Cracker Crust
- 1 cup finely crushed graham cracker crumbs (about 7 whole graham crackers)
- 1/4 cup powdered sugar
- 6 tablespoons butter, melted
Filling & Topping
- 12 marshmallows (regular size, not mini marshmallows)
- 2 full size Hershey’s Chocolate Bars (unwrapped and divided into 24 pieces)
Instructions
- Preheat Oven: Preheat your oven to 350°F (175°C) to get ready for baking the graham cracker crusts.
- Make Crust Mixture: In a small mixing bowl, combine the finely crushed graham cracker crumbs, powdered sugar, and melted butter. Stir until all ingredients are evenly mixed and the mixture starts to hold together.
- Prepare Muffin Pan: Grease a 24-cup mini muffin pan thoroughly with non-stick cooking spray to prevent sticking. Then, scoop the graham cracker crust mixture into each cup.
- Form Cups: Gently press the crumb mixture into the bottom and up the sides of each muffin cup to create small crust cups capable of holding the fillings.
- Bake Crust Cups: Bake the crusts in the preheated oven for 4 minutes until they are golden brown and set. This short bake helps firm up the crust so it holds its shape.
- Prepare Marshmallows: While the crust is baking, cut each marshmallow in half horizontally to make 24 thin rounds, which will fit perfectly into each crust cup.
- Add Marshmallows: Remove the crust cups from the oven, and place one marshmallow half into each cup, cut side down, fitting snugly inside the graham cracker base.
- Broil Marshmallows: Switch the oven setting to broil. Place the muffin pan back into the oven under the broiler. Broil for 1-2 minutes until the marshmallows soften and start to toast; watch closely to avoid burning.
- Add Chocolate: Immediately top each toasted marshmallow with one piece of the divided Hershey’s chocolate bar so it begins melting from the heat.
- Cool and Serve: Allow the s’mores cookie cups to cool in the pan for about 15 minutes so they firm up slightly. Use a butter knife to gently lift each cup out of the pan before serving.
Notes
- Watch the marshmallows carefully during broiling, as they can burn quickly.
- You can substitute milk chocolate with dark or white chocolate according to preference.
- For easier removal, cooling the cookie cups thoroughly before lifting helps prevent breaking.
- Make sure to use regular-sized marshmallows to match the recipe proportions.


