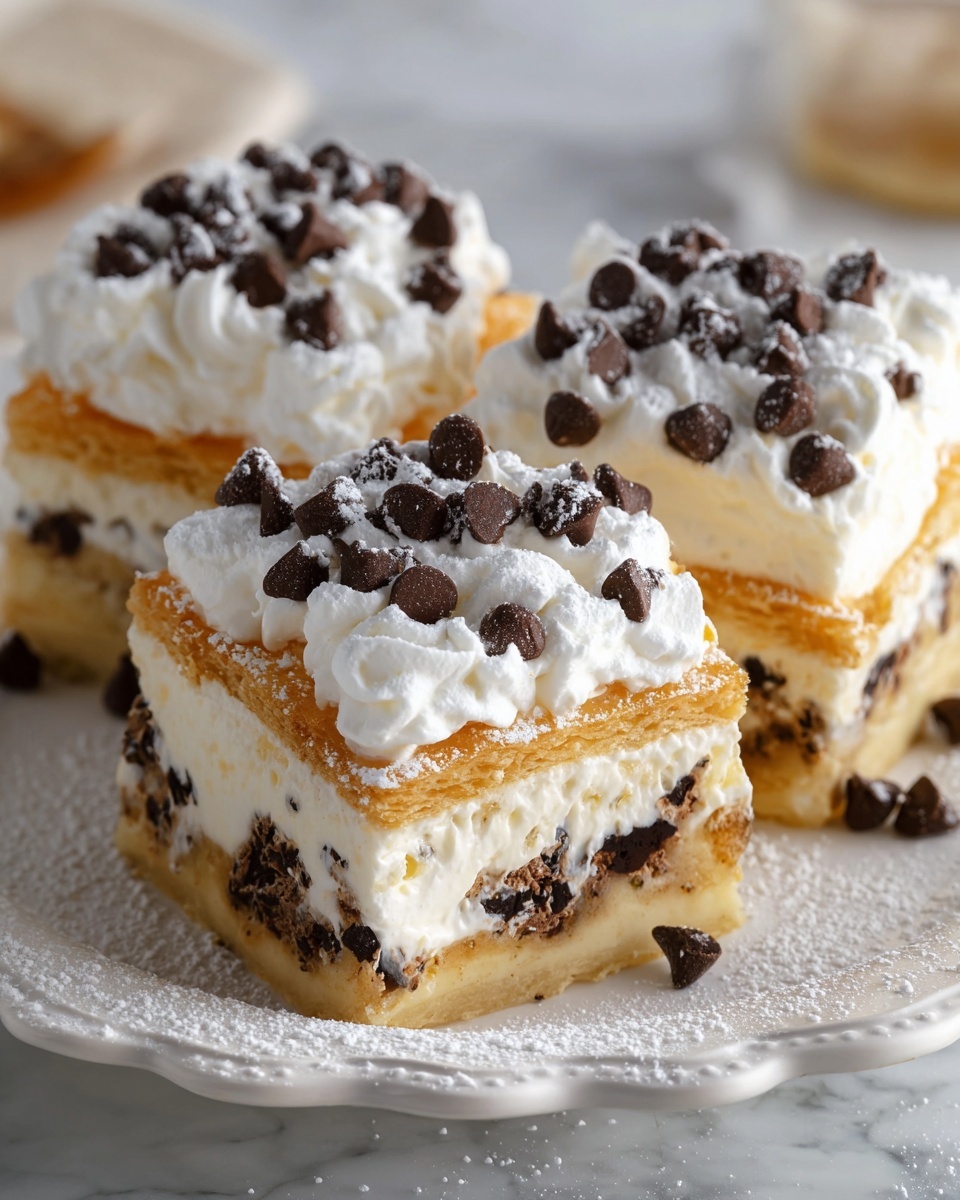
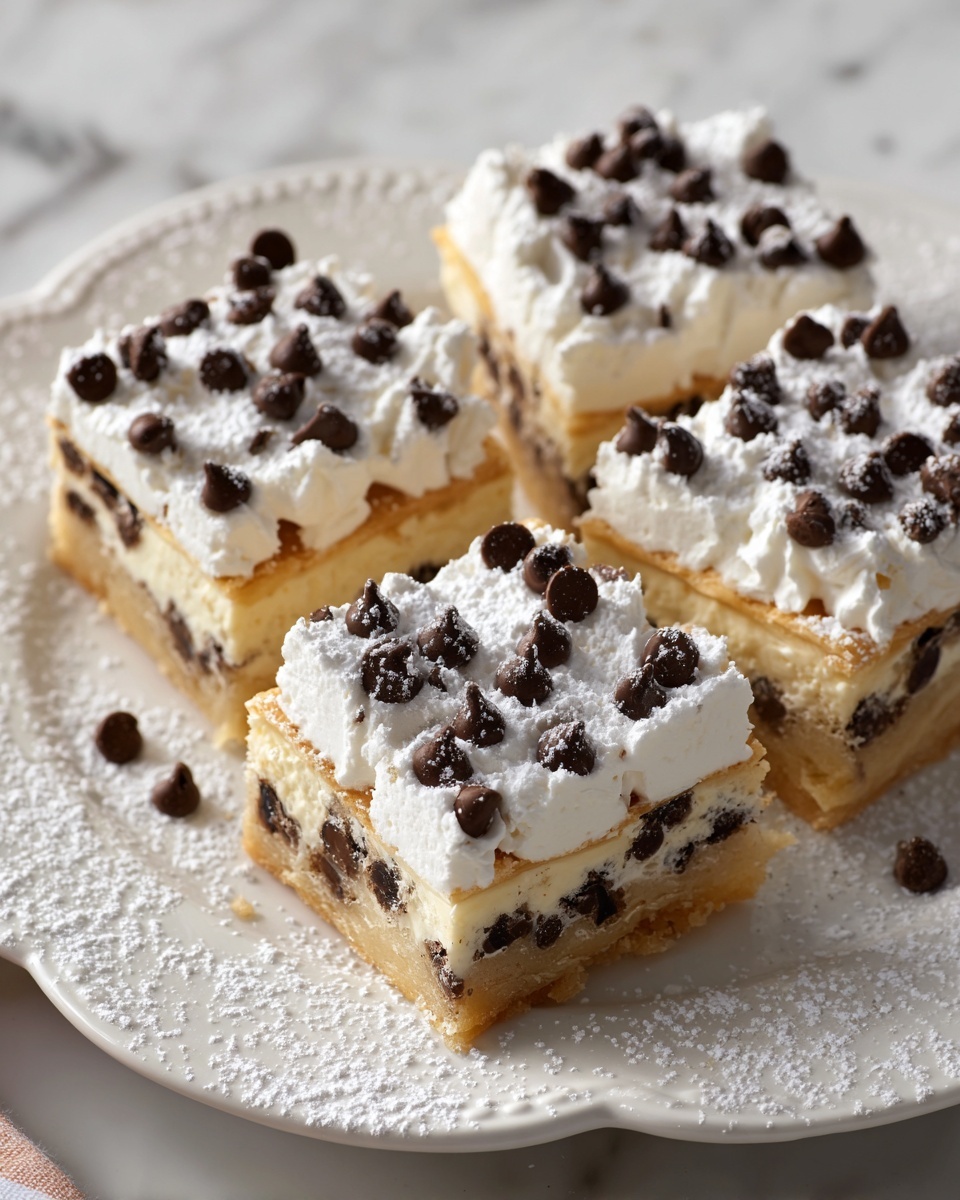
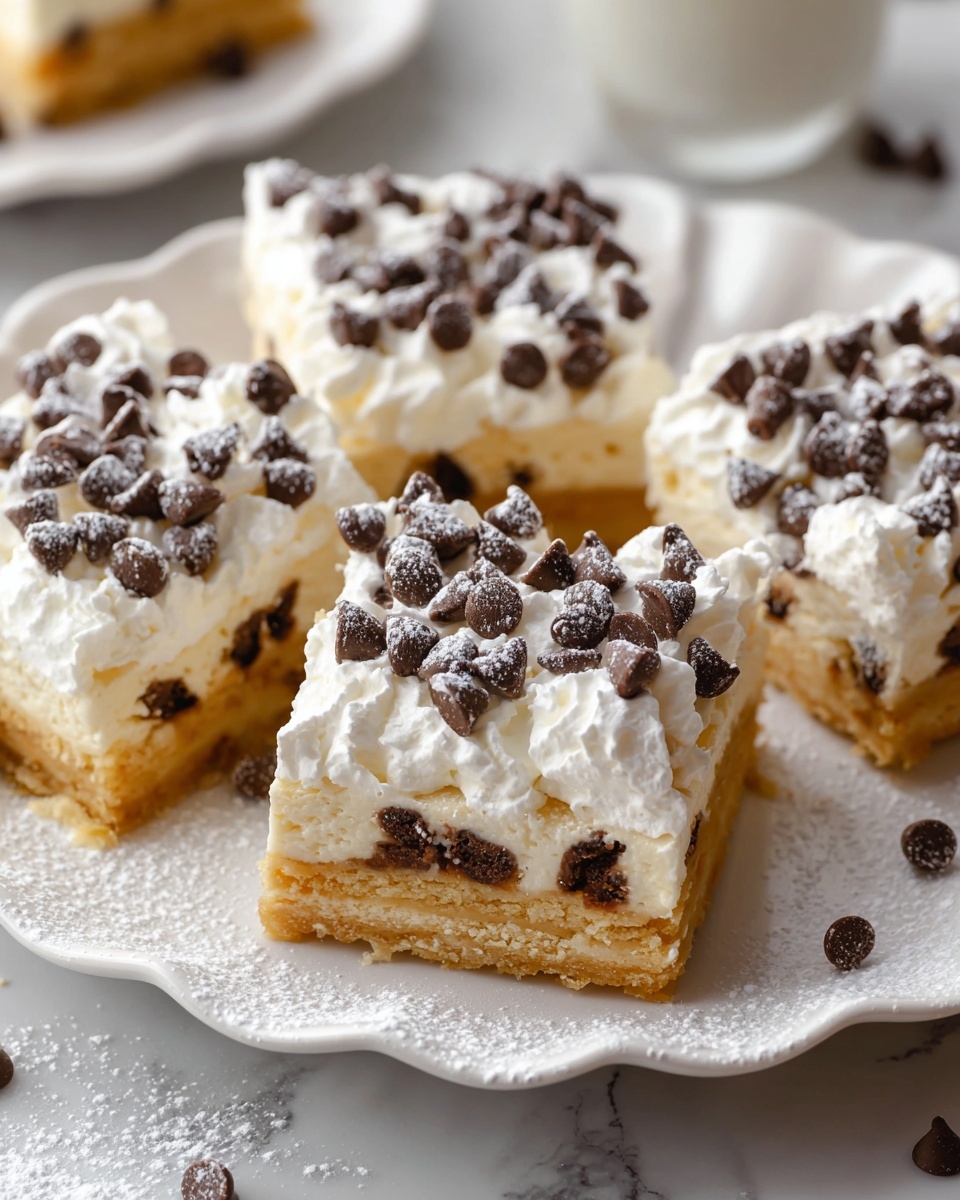
If you are searching for a delightful twist on a beloved Italian dessert, this Classic Cannoli Squares Recipe is sure to become your new favorite. Imagine the creamy, sweet ricotta filling you love in traditional cannoli, but reimagined as a luscious, easy-to-cut square with a flaky, golden crust. Every bite offers a beautiful balance of smooth filling and crispy pastry, dotted with little bursts of chocolate chips that make it impossible to resist. It’s an inviting, approachable dessert that elevates any occasion, whether you’re entertaining friends or just craving something special at home.
Ingredients You’ll Need
This recipe shines because it keeps things wonderfully simple, relying on a handful of ingredients that each play an essential role. From the velvety ricotta that brings richness to the filling, to the cinnamon that adds a subtle warm spice, every component works together to create that classic cannoli flavor in an irresistible new form.
- 2 cups whole-milk ricotta cheese: The creamy base that gives the filling its smooth texture—make sure to drain excess liquid for the best result.
- 1 cup powdered sugar: Adds sweetness and helps create a silky filling without any grittiness.
- 1 teaspoon vanilla extract: Infuses the filling with a warm, aromatic note that complements the ricotta perfectly.
- ½ teaspoon ground cinnamon: Offers a subtle spice that brightens up the flavor profile without overwhelming it.
- ½ cup mini chocolate chips: These little bursts of chocolate are classic cannoli essential, giving the squares delightful pockets of sweetness.
- 2 pre-made pie crusts: Using ready-made crusts makes this recipe accessible while still ensuring a flaky, buttery base and top layer.
- 1 large egg (for egg wash): Gives the top crust a gorgeous golden color and a glossy finish when baked.
- Sugar (for sprinkling on top): Adds a sparkling crunch to the crust once baked—for that extra touch of sweetness.
- Optional garnishes (¼ cup chopped pistachios, 3 maraschino cherries, extra chocolate chips): These classic toppings enhance both flavor and presentation beautifully.
How to Make Classic Cannoli Squares Recipe
Step 1: Preheat and Prepare
Start by warming up your oven to 375°F (190°C). This ensures the perfect environment for the pie crust to bake evenly and the filling to set just right, making your Classic Cannoli Squares Recipe come together smoothly.
Step 2: Whisk Together the Filling
In a mixing bowl, combine the ricotta, powdered sugar, vanilla extract, ground cinnamon, and mini chocolate chips. Whisk until everything is smooth and well blended. The filling should be creamy with delightful flecks of chocolate throughout, ready to bring that classic cannoli taste to your squares.
Step 3: Press in Your Bottom Crust
Gently fit one of the pie crusts into a 9×9-inch baking dish, making sure it hugs every corner snugly. This will be the sturdy base holding all the creamy filling, so a careful fit is key to achieving that perfect bite.
Step 4: Spread the Filling
Evenly spread the luscious ricotta mixture over the bottom crust. Leave a small border around the edges so the top crust can seal perfectly—this step is important to keep your filling intact while baking.
Step 5: Seal with Top Crust
Lay your second pie crust over the filling. Press down gently and crimp the edges with your fingers or a fork to seal everything inside, locking in those rich flavors and making sure the dessert bakes beautifully.
Step 6: Add Egg Wash and Sugar
Beat the egg and brush it generously over the top crust. Then sprinkle sugar across it for a touch of sparkle and crunch once baked. This simple step elevates the appearance and texture, creating a golden crust that’s as inviting as the filling is delicious.
Step 7: Bake Until Golden
Pop the dish into your preheated oven and bake for 30 to 35 minutes. You’ll know it’s done when the crust turns a gorgeous golden brown and you can see the filling gently bubbling, signaling a perfectly set dessert.
Step 8: Cool Before Slicing
Once out of the oven, allow the squares to cool for at least 30 minutes. This resting period lets the filling set firmly so you can cut clean squares without the filling spilling out—trust me, patience pays off here!
Step 9: Serve and Enjoy
Serve these delightful squares warm or chilled. Add your favorite garnishes like chopped pistachios, maraschino cherries, or extra chocolate chips to give each piece that authentic cannoli flair and an irresistible finish.
How to Serve Classic Cannoli Squares Recipe
Garnishes
Garnishing your Classic Cannoli Squares Recipe isn’t just about looks—it adds texture and flavor dimensions that make each bite exciting. A sprinkle of chopped pistachios brings a lovely nutty crunch, while maraschino cherries add a pop of sweetness and color that feels festive and inviting. Extra mini chocolate chips scattered on top provide a delicious promise of chocolatey goodness with every forkful.
Side Dishes
This dessert pairs wonderfully with a simple espresso or a lightly whipped cream on the side for contrast and richness. Fresh berries or a citrusy fruit salad can provide a refreshing counterpoint that cuts through the creamy ricotta, balancing the richness and making the meal feel complete.
Creative Ways to Present
Slice your Classic Cannoli Squares Recipe into neat portions and arrange them on a decorative platter sprinkled with powdered sugar or cocoa powder. For a fun twist, consider layering the squares in a trifle dish with layers of whipped cream and berries, turning this classic dessert into a stunning centerpiece dessert everyone will admire.
Make Ahead and Storage
Storing Leftovers
Leftover Classic Cannoli Squares can be stored in an airtight container in the refrigerator for up to three days. Keeping them cool preserves the delicate ricotta filling and prevents the crust from getting soggy, ensuring each serving tastes as fresh as when it was first baked.
Freezing
If you want to make this dessert ahead of time for a special event, you can freeze the baked squares. Wrap them well in plastic wrap and then foil to protect against freezer burn. When you’re ready, thaw overnight in the refrigerator and enjoy nearly as fresh as the day you made them.
Reheating
For the best texture, warm your cannoli squares gently in a 300°F (150°C) oven for about 10 minutes. This will revive the crispiness of the crust without drying out the creamy filling. Avoid microwaving, which can make the crust chewy or soggy.
FAQs
Can I use part-skim ricotta instead of whole-milk ricotta?
While whole-milk ricotta provides the creamiest and richest filling, you can use part-skim ricotta for a lighter option. Just be aware that the texture might be slightly less smooth and the flavor a bit milder.
Is it necessary to drain the ricotta before using it?
Yes, draining excess liquid from the ricotta is important to prevent a runny filling. You can do this by placing the ricotta in a fine mesh strainer or cheesecloth and letting it sit for 30 minutes before using.
Can I make the filling ahead of time?
You sure can! Prepare the ricotta filling a day in advance and store it covered in the refrigerator. Just give it a quick stir before spreading it over the crusts. This makes assembly quick and stress-free.
What can I substitute for pre-made pie crust?
If you prefer homemade, feel free to make your own pie crust or even use phyllo dough for a lighter, flakier texture. Just adjust baking times as needed to avoid over-browning.
Is this dessert best served warm or cold?
The Classic Cannoli Squares Recipe is amazing served either warm or chilled. Warm serving lets the filling feel extra creamy, while chilled squares have a firmer texture that many also enjoy. It’s a delicious choice either way!
Final Thoughts
I hope this Classic Cannoli Squares Recipe inspires you to bring a bit of Italian sweetness into your kitchen with ease and joy. It’s a wonderfully approachable twist on a much-loved dessert that’s perfect for sharing with friends and family. Once you try it, I bet it’ll become a go-to treat that everyone asks for again and again. Happy baking!
Print
Classic Cannoli Squares Recipe
- Prep Time: 30 minutes
- Cook Time: 35 minutes
- Total Time: 1 hour 5 minutes
- Yield: 9 squares
- Category: Dessert
- Method: Baking
- Cuisine: Italian
- Diet: Vegetarian
Description
Classic Cannoli Squares are a delightful twist on traditional cannoli, featuring a creamy ricotta filling studded with mini chocolate chips sandwiched between two flaky pie crusts. Baked to golden perfection and sprinkled with sugar on top, these squares are perfect for serving as a dessert or a sweet snack. Garnished with chopped pistachios, maraschino cherries, or extra chocolate chips, they offer a rich, creamy texture with a hint of cinnamon and vanilla for an authentic Italian-inspired treat.
Ingredients
Filling
- 2 cups whole-milk ricotta cheese (drained if very watery)
- 1 cup powdered sugar
- 1 teaspoon vanilla extract
- ½ teaspoon ground cinnamon
- ½ cup mini chocolate chips
Crust and Topping
- 2 pre-made pie crusts (for a 9×9-inch baking dish)
- 1 large egg (for egg wash)
- Sugar (for sprinkling on top)
Optional Garnishes
- ¼ cup chopped pistachios
- 3 maraschino cherries
- Extra chocolate chips
Instructions
- Preheat the Oven: Preheat your oven to 375°F (190°C) to ensure it is at the perfect temperature for baking the cannoli squares evenly.
- Prepare the Filling: In a mixing bowl, whisk together the ricotta cheese, powdered sugar, vanilla extract, ground cinnamon, and mini chocolate chips until the mixture is smooth and well combined, creating a creamy and flavorful filling.
- Fit the Bottom Crust: Press one of the pre-made pie crusts into the bottom of a 9×9-inch baking dish, making sure it fits snugly into the corners to create a sturdy base for the filling.
- Spread the Filling: Evenly spread the prepared ricotta filling over the bottom crust, leaving a small border around the edges to allow for sealing the top crust properly.
- Top with Second Crust: Place the second pie crust over the filling carefully, then seal the edges by crimping with your fingers or a fork to keep the filling enclosed while baking.
- Apply Egg Wash and Sugar: Beat the large egg and brush it over the top crust to promote a golden brown finish. Sprinkle generously with sugar for a sweet, crunchy topping.
- Bake: Bake in the preheated oven for 30 to 35 minutes, or until the crust turns golden brown and the filling is gently bubbling, indicating the squares are fully cooked.
- Cool: Allow the baked cannoli squares to cool for at least 30 minutes in the baking dish to help the filling set, making them easier to slice.
- Serve and Garnish: Slice into squares and serve warm or chilled. Optionally garnish with chopped pistachios, maraschino cherries, or extra chocolate chips according to your preference.
Notes
- Drain the ricotta cheese well if it is watery to avoid a soggy filling.
- Use chilled pie crusts for easier handling and a flakier texture.
- The squares can be served warm for a softer texture or chilled for a firmer filling.
- Storing leftovers in the refrigerator helps maintain freshness; reheat if desired before serving.
- Feel free to customize the filling by adding other mix-ins like chopped nuts or dried fruit.


