
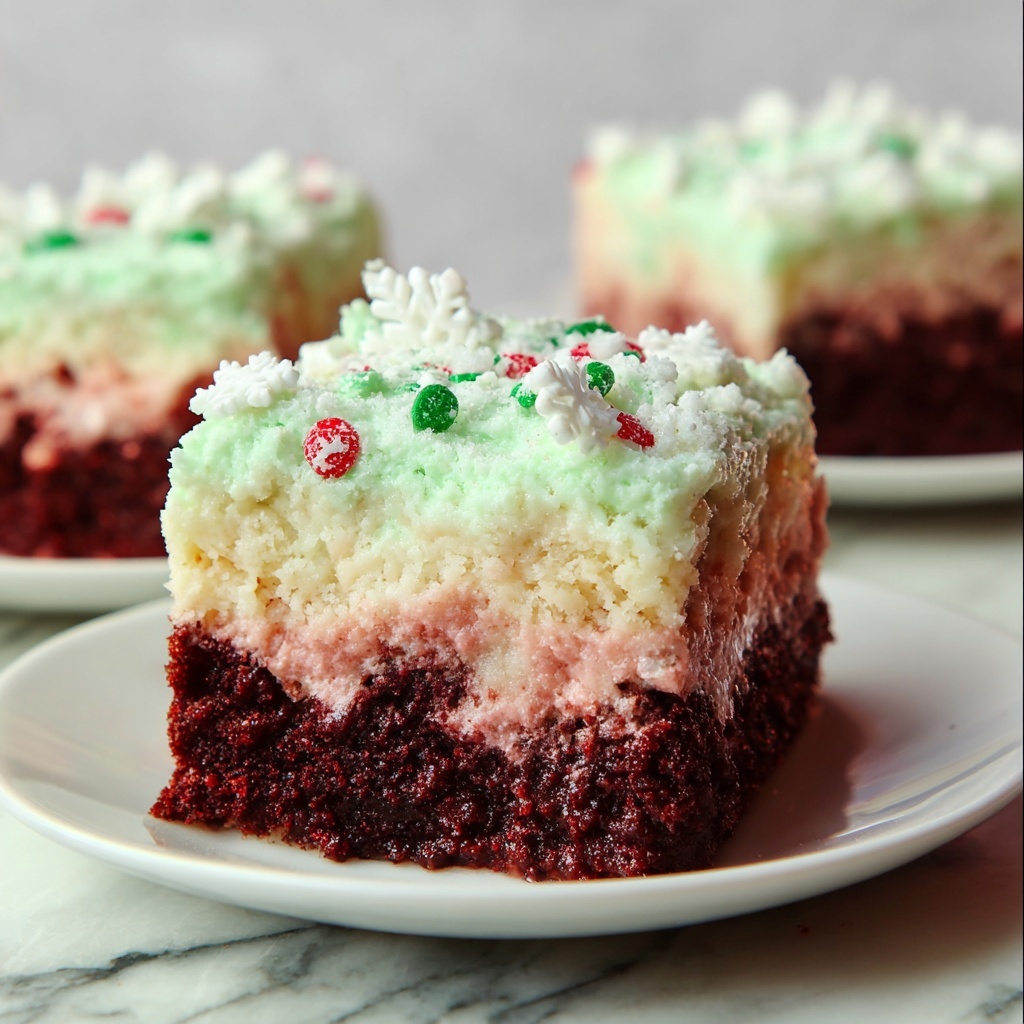
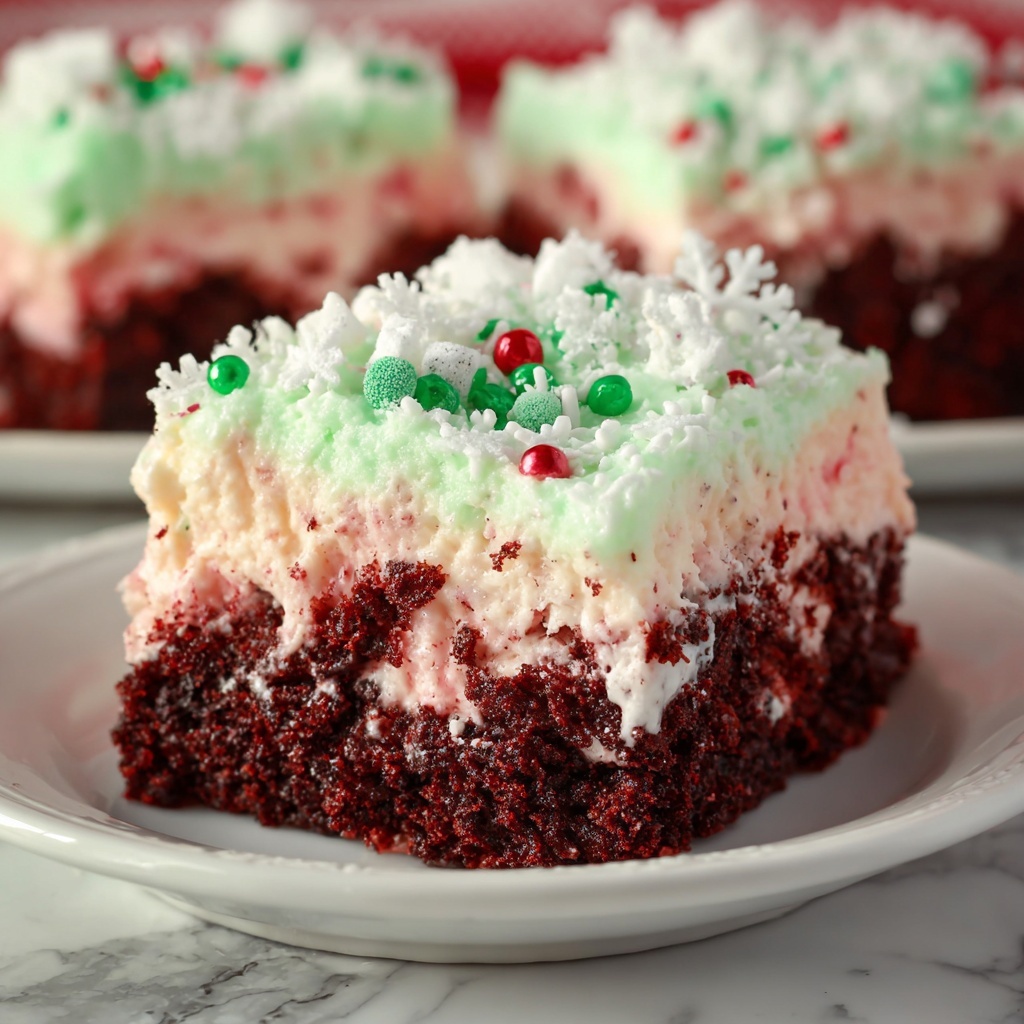
If you’re dreaming of a festive dessert that’s as delightful to eat as it is to look at, then this Christmas Red Velvet Poke Cake Recipe is going to steal your heart. Imagine a moist, tender red velvet cake infused with rich vanilla pudding that seeps into every nook and cranny, topped with luscious whipped cream dyed a cheerful holiday green and adorned with colorful sprinkles and delicate white chocolate shavings. It’s joyful, indulgent, and surprisingly easy to make—a true centerpiece for your holiday table that brings smiles with every bite.
Ingredients You’ll Need
Don’t let the simplicity of the ingredients fool you—each one plays a vital role in creating the perfect balance of flavor, color, and texture that makes this Christmas Red Velvet Poke Cake Recipe shine. From the rich red velvet base to the creamy pudding filling and the dreamy green whipped topping, every component works together like a festive symphony.
- 1 box red velvet cake mix: The foundation of our cake, delivering that signature rich cocoa flavor and vibrant red color.
- 2 3.4oz. boxes Instant Vanilla Pudding Mix: Adds a smooth, creamy layer that soaks into the cake holes for luscious moisture.
- 4 cups whole milk: Essential for preparing the pudding with a creamy, full-bodied texture.
- 2 cups heavy cream: The base for whipping into fluffy, light topping that contrasts beautifully with the dense cake.
- 10 drops green food coloring: Gives your whipped cream that perfect festive tint, instantly evoking holiday cheer.
- Red sugar sprinkles: Adds sparkle and texture with classic Christmas color.
- Green sugar sprinkles: Complements the whipped cream and adds more vibrant holiday flair.
- Snowflake sprinkles: Brings a whimsical, wintry touch that’s perfect for Christmas celebrations.
- White chocolate shavings: Adds a subtle sweetness and lovely snowy appearance on top.
How to Make Christmas Red Velvet Poke Cake Recipe
Step 1: Bake the red velvet cake
Begin by preparing the red velvet cake mix exactly as directed on the box. This ensures a tender crumb with that unmistakable rich flavor. Once baked, allow the cake to cool slightly before moving on to the next step.
Step 2: Poke holes in the cake
Using the back of a wooden spoon, gently poke holes all over the surface of your warm cake. This step is crucial because it allows the pudding to seep deep into the cake, creating moist, flavorful pockets that turn every bite into a delightful surprise.
Step 3: Prepare the vanilla pudding
Whisk together both boxes of instant vanilla pudding mix with 4 cups of whole milk until fully blended and smooth. This pudding will be your creamy filling that melds wonderfully with the rich cake.
Step 4: Pour pudding over cake and fill holes
Slowly pour the pudding mixture evenly over the cake, making sure it seeps into all those poked holes. Use a spatula to gently smooth the surface, ensuring every inch of cake absorbs the luscious pudding.
Step 5: Refrigerate to set the pudding
Place the pudding-soaked cake in the refrigerator for at least a few hours, or ideally overnight. This resting period is key because it allows the pudding to firm up inside the cake, giving you that perfect poke cake texture that is both creamy and moist.
Step 6: Whip the heavy cream
While the cake chills, beat the heavy cream until soft peaks form. This airy whipped cream will be the crowning glory of the cake, adding lightness and a beautiful contrast to the rich layers below.
Step 7: Add green food coloring to whipped cream
Gently fold in 10 drops of green food coloring to your whipped cream. This mixture creates a festive, vibrant topping that visually pops and perfectly fits the Christmas spirit.
Step 8: Top the cake with whipped cream and decorations
Once your pudding has set, spread the green whipped cream evenly over the top of the cake. Finish by generously sprinkling red and green sugar sprinkles, snowflake decorations, and white chocolate shavings to create a winter wonderland on every slice.
Step 9: Serve or chill before serving
You can serve this cake right away to enjoy the fresh whipped cream or refrigerate it a bit longer to let the flavors meld even more. Either way, it will be a centerpiece dessert that wows your guests.
How to Serve Christmas Red Velvet Poke Cake Recipe
Garnishes
A well-garnished Christmas Red Velvet Poke Cake Recipe really elevates the festive atmosphere. Aside from the sprinkles and chocolates already on top, consider adding fresh raspberries or a dusting of powdered sugar to mimic a gentle snowfall. These finishing touches not only add flavor but also create an inviting presentation.
Side Dishes
This cake pairs beautifully with warm drinks like hot cocoa, spiced apple cider, or even a cup of fresh brewed coffee—the rich flavors complement and balance the sweet and creamy dessert. For a bit of variety, a light fruit salad or citrus sorbet on the side can also refresh the palate and keep the meal feeling light.
Creative Ways to Present
For a fun twist, try cutting the Christmas Red Velvet Poke Cake Recipe into smaller squares and serving them in clear individual cups layered with extra whipped cream and festive sprinkles. Or shape it into a festive bundt or loaf pan for a unique appearance. The poke cake is versatile enough to adapt to your holiday party’s style while maintaining its signature charm.
Make Ahead and Storage
Storing Leftovers
Store any leftover Christmas Red Velvet Poke Cake Recipe tightly covered in the refrigerator. This will keep it fresh and flavorful for up to 3 days. The pudding and whipped cream layers hold moisture well, so the cake stays luscious without drying out.
Freezing
Although this cake is best enjoyed fresh, you can freeze baked but unpoked and unfilled red velvet cake layers in an airtight container for up to a month. Whipped cream toppings do not freeze well, so it’s best to prepare those fresh before serving after thawing.
Reheating
Because the pudding-soaked cake is best served chilled, reheating is not recommended. Instead, remove the cake from the refrigerator about 15-20 minutes before serving to allow the flavors to mellow and the whipped cream to soften slightly.
FAQs
Can I use homemade red velvet cake instead of a boxed mix?
Absolutely! If you prefer, use your favorite homemade red velvet cake recipe. The key is having a tender cake that absorbs the pudding well. Homemade can add a personal touch and even deeper flavor.
What if I don’t have green food coloring?
If you’d like to avoid artificial coloring, you can use natural options such as matcha powder or spinach juice, but keep in mind these may alter the taste slightly. Otherwise, simply use plain whipped cream for a classic look.
Can I substitute the vanilla pudding with another flavor?
Vanilla pudding is recommended for its smooth, mild flavor that complements red velvet beautifully. However, chocolate or cream cheese pudding can add interesting variations if you want to experiment.
How long does the cake need to chill before serving?
For best results, chill the cake for at least 3 hours so the pudding fully sets in the poked holes. Overnight chilling intensifies the flavor and texture, making it even more delicious.
Is the cake suitable for freezing after it’s assembled?
Since the poke cake has pudding and whipped cream, freezing after assembly is not ideal as it can affect texture and cause the cream to separate. It’s best to freeze components separately if needed.
Final Thoughts
Trust me, once you try this Christmas Red Velvet Poke Cake Recipe, it will become a must-make tradition in your holiday celebrations. It’s festive, fun, and effortlessly delicious—a guaranteed way to spread holiday joy right from your kitchen to your guests’ hearts. Grab your ingredients, invite some friends or family, and let the baking magic begin!
Print
Christmas Red Velvet Poke Cake Recipe
- Prep Time: 30 minutes
- Cook Time: 33 minutes
- Total Time: 3 hours 3 minutes
- Yield: 18 servings
- Category: Dessert
- Method: Baking
- Cuisine: American
Description
This festive Christmas Red Velvet Poke Cake combines a moist red velvet base with creamy vanilla pudding infused into its pores, topped with luscious green-tinted whipped cream and seasonal sprinkles for a visually stunning and delicious holiday dessert.
Ingredients
Cake
- 1 box red velvet cake mix
Pudding Filling
- 2 (3.4 oz) boxes Instant Vanilla Pudding Mix
- 4 cups whole milk
Topping
- 2 cups heavy cream
- 10 drops green food coloring
- red sugar sprinkles
- green sugar sprinkles
- snowflake sprinkles
- white chocolate shavings
Instructions
- Prepare Cake: Follow the instructions on the red velvet cake mix box to prepare and bake the cake as directed, usually involving mixing the cake mix with specified ingredients, then baking it in a preheated oven for about 33 minutes or until a toothpick comes out clean.
- Poke Holes: After the cake has cooled slightly but is still warm, use the back of a wooden spoon to poke holes all over the surface to help the pudding fill the cake evenly.
- Make Pudding: In a mixing bowl, whisk together the instant vanilla pudding mixes with 4 cups of whole milk until smooth and fully blended.
- Fill Pudding into Cake: Pour the prepared pudding evenly over the cake, ensuring it seeps into the holes. Use a spatula to gently smooth the pudding into the holes.
- Chill Cake: Place the cake in the refrigerator and allow the pudding to set for several hours, ideally 2-4 hours, so it fully absorbs and firms up inside the cake.
- Whip Cream: Use an electric mixer to beat the heavy cream until soft peaks form, being careful not to overbeat.
- Add Color: Add 10 drops of green food coloring to the whipped cream and gently fold it in until the color is evenly distributed.
- Top Cake: Spread the green whipped cream evenly over the top of the chilled pudding-filled cake. Decorate with red sugar sprinkles, green sugar sprinkles, snowflake sprinkles, and white chocolate shavings for a festive finish.
- Serve or Refrigerate: Serve the cake immediately or keep it refrigerated until ready to serve to maintain freshness.
Notes
- Ensure the cake has cooled slightly before poking holes to avoid burning yourself or creating overly large holes.
- Refrigerate the cake for at least 2 hours for the pudding to properly set and soak into the cake.
- Use heavy cream chilled for best whipping results.
- This cake is best served within 2 days for optimum freshness.
- Feel free to customize sprinkles and toppings to match your holiday decor.

