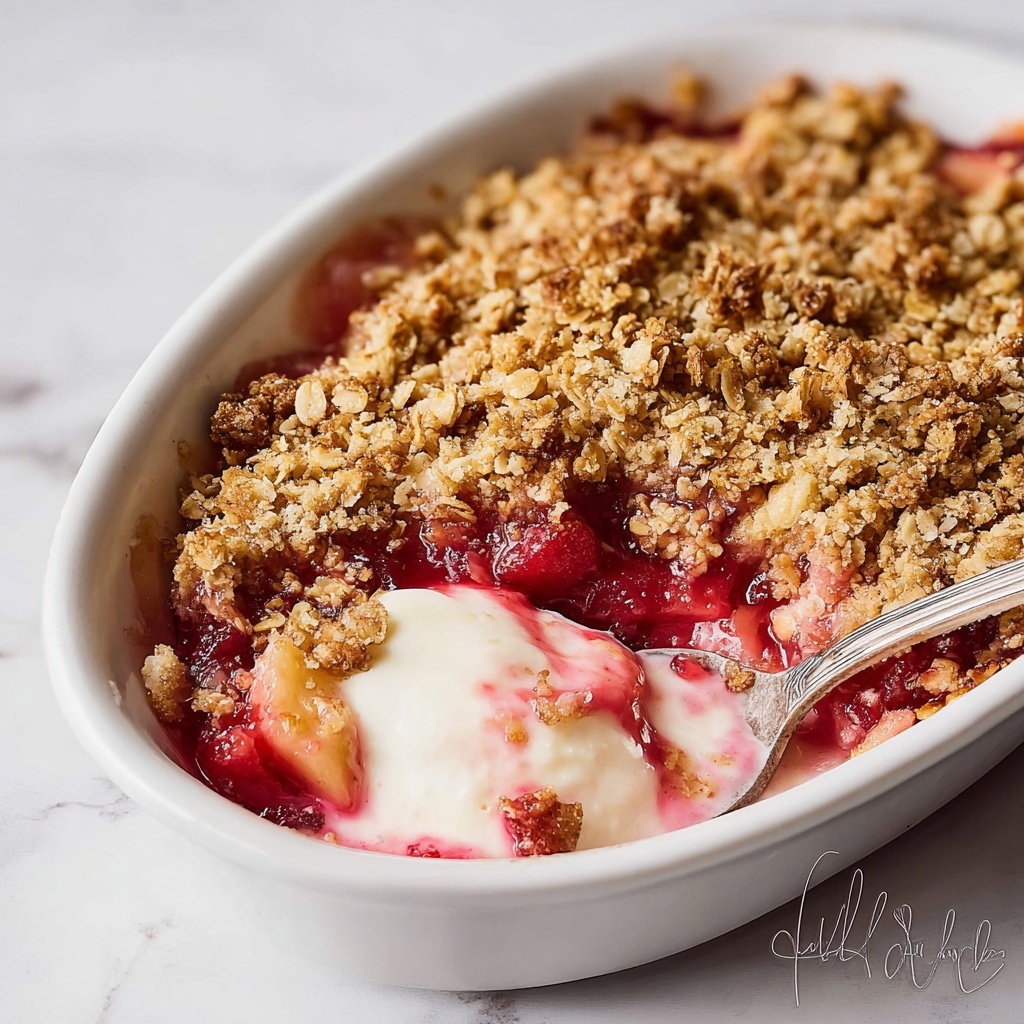
If you’re looking for a delightful dessert that beautifully balances tart and sweet flavors, the Classic Rhubarb Crisp Recipe is an absolute must-try. This comforting, rustic dish brings together tender, tangy rhubarb with a crunchy, buttery oat topping that’s simply irresistible. It’s the kind of recipe that warms your kitchen with delicious aromas and fills your heart with nostalgia. Whether you’re serving it at a family gathering or simply craving something sweet after dinner, this classic treat never disappoints.
Ingredients You’ll Need
The magic of this dessert lies in its simplicity. Each ingredient plays a crucial role in creating the perfect balance of flavors and textures, from the tartness of fresh rhubarb to the crispy, golden oat topping.
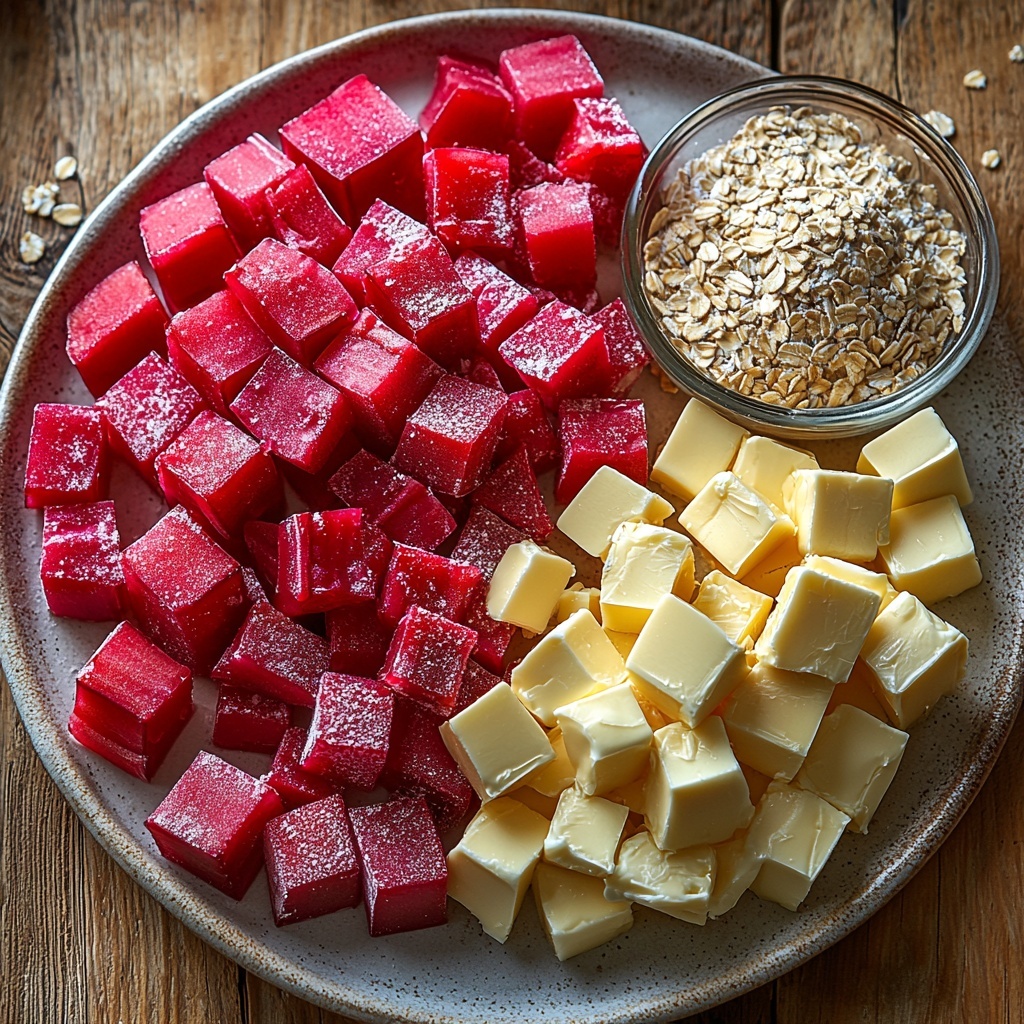
- 4 cups fresh rhubarb, chopped: The star of the dish, providing that lovely tang and vibrant color.
- 1 cup granulated sugar: Sweetens the rhubarb to balance its natural tartness perfectly.
- 2 tbsp all-purpose flour: Helps thicken the rhubarb filling so it’s just the right consistency.
- 1 cup rolled oats: Adds a hearty, chewy texture to the crisp topping.
- 1 cup all-purpose flour: Forms the base of the crumbly and buttery topping.
- ½ cup brown sugar, packed: Brings deep caramel notes to the crisp crust.
- ½ cup cold butter, cubed: Creates the rich, melt-in-your-mouth topping that crisps up as it bakes.
How to Make Classic Rhubarb Crisp Recipe
Step 1: Prepare Your Oven and Dish
Start by preheating your oven to 375°F (190°C) so it will be hot and ready. Grease a baking dish to ensure the crisp doesn’t stick and can be served with ease once baked.
Step 2: Mix the Rhubarb Filling
In a large bowl, toss your freshly chopped rhubarb with granulated sugar and 2 tablespoons of all-purpose flour. This simple combination sweetens the rhubarb while the flour will help thicken the juices released during baking, making every bite perfect.
Step 3: Make the Crisp Topping
Grab another bowl and combine the rolled oats, 1 cup of flour, brown sugar, and cold cubed butter. Use your fingers or a pastry cutter to blend everything until it looks like coarse crumbs. This technique ensures that your topping will be delightfully crumbly and crisp.
Step 4: Assemble the Crisp
Evenly spread the rhubarb mixture in your greased baking dish. Then, generously sprinkle the oat topping over the rhubarb, covering every inch to lock in the flavors and create that perfect crunchy layer on top.
Step 5: Bake Until Golden
Place the dish in the oven and bake for 35 to 40 minutes. You’ll know it’s done when the topping turns a lovely golden brown and the filling bubbles beautifully around the edges, promising a rich, luscious treat inside.
Step 6: Cool and Serve
Allow the rhubarb crisp to cool for a few minutes after baking. This resting time thickens the filling more and lets the flavors meld. Serve it warm, on its own or with your favorite ice cream for an extra indulgent experience.
How to Serve Classic Rhubarb Crisp Recipe
Garnishes
A sprinkle of chopped toasted almonds or a dollop of whipped cream adds a lovely contrast in texture and richness. Fresh mint leaves can also brighten the presentation and add a subtle aromatic note.
Side Dishes
This classic dessert pairs beautifully with a scoop of vanilla ice cream or a spoonful of thick Greek yogurt. If you want to keep it simple but still indulgent, warm custard is another fabulous sidekick.
Creative Ways to Present
For a fun twist, serve the classic rhubarb crisp in individual ramekins or mason jars, making it feel extra special. You can also layer it with a bit of cream or mascarpone for a parfait-style dessert that’s as pretty as it is delicious.
Make Ahead and Storage
Storing Leftovers
Once cooled, cover the crisp tightly with plastic wrap or foil and keep it in the refrigerator. It will stay fresh and delightful for up to 3 days, making it perfect for preparing in advance or enjoying later.
Freezing
You can freeze the rhubarb crisp before baking by covering it well with plastic wrap and foil to prevent freezer burn. When you’re ready to enjoy, bake it straight from frozen, adding a bit of extra time to the baking process to ensure it heats through and the topping crisps up nicely.
Reheating
For the best texture when reheating, warm the crisp in an oven set to 350°F (175°C) for about 15 minutes. This keeps the topping crunchy while the filling becomes warm and bubbling again—much better than a microwave, which can sometimes make the topping soggy.
FAQs
Can I use frozen rhubarb for this Classic Rhubarb Crisp Recipe?
Yes, frozen rhubarb works just fine. Just thaw it completely and drain any excess liquid before mixing with sugar and flour to avoid a watery filling.
Is this recipe very sweet?
The sugar balances the natural tartness of rhubarb perfectly, so it’s sweet but not overly sugary. If you prefer, you can adjust the sugar slightly to suit your taste.
Can I add other fruits to the rhubarb crisp?
Absolutely! Strawberries, apples, or raspberries are fantastic additions that complement rhubarb’s tangy flavor. Just keep the total fruit quantity about the same to maintain the right texture.
What’s the best source of rhubarb?
Look for firm, bright red stalks that snap easily. Fresh rhubarb is seasonal in spring and early summer, but good quality frozen rhubarb is an excellent alternative.
Can I make the oat topping vegan?
Yes! Swap the butter for a firm coconut oil or vegan margarine for a delicious, dairy-free crisp that still has that beautiful crumbly texture.
Final Thoughts
I can’t recommend the Classic Rhubarb Crisp Recipe enough for anyone who loves a cozy, comforting dessert with a perfect balance of tart and sweet. Simple, satisfying, and full of character, this is one dessert that’s sure to become a staple in your repertoire. So grab some fresh rhubarb and get baking – your taste buds will thank you!
Print
Classic Rhubarb Crisp Recipe
- Prep Time: 15 minutes
- Cook Time: 40 minutes
- Total Time: 55 minutes
- Yield: 8 servings
- Category: Dessert
- Method: Baking
- Cuisine: American
Description
This Classic Rhubarb Crisp is a delightful dessert featuring tart fresh rhubarb topped with a buttery, crunchy oat and brown sugar crumble. Perfectly baked to a golden brown, it’s a comforting treat that combines juicy fruit with a crisp, sweet topping, ideal for serving warm with ice cream or on its own.
Ingredients
For the Rhubarb Filling
- 4 cups fresh rhubarb, chopped
- 1 cup granulated sugar
- 2 tbsp all-purpose flour
For the Crisp Topping
- 1 cup rolled oats
- 1 cup all-purpose flour
- ½ cup brown sugar, packed
- ½ cup cold butter, cubed
Instructions
- Preheat and Prepare Baking Dish: Preheat the oven to 375°F (190°C) and grease a baking dish to ensure the crisp does not stick during baking.
- Prepare Rhubarb Filling: In a mixing bowl, combine the chopped rhubarb with granulated sugar and 2 tablespoons of all-purpose flour. Toss together until the rhubarb is evenly coated, which will help thicken the juices during baking.
- Make the Crisp Topping: In another bowl, mix rolled oats, 1 cup of all-purpose flour, brown sugar, and cold cubed butter. Use your fingers or a pastry cutter to blend these ingredients until the mixture resembles coarse crumbs, which will create the signature crunchy topping.
- Assemble the Crisp: Spread the rhubarb mixture evenly in the greased baking dish. Sprinkle the oat and butter crumble mixture evenly over the rhubarb layer, covering it completely.
- Bake: Place the baking dish in the preheated oven and bake for 35 to 40 minutes, or until the topping is golden brown and the filling is bubbling around the edges, indicating that it’s fully cooked.
- Cool and Serve: Remove from the oven and allow the crisp to cool slightly before serving. Enjoy it warm, optionally with a scoop of ice cream for an extra indulgent touch.
Notes
- Fresh rhubarb is preferred for the best flavor and texture, but frozen rhubarb can be used if thawed and drained well.
- For a gluten-free version, substitute all-purpose flour with a gluten-free flour blend and ensure oats are certified gluten-free.
- Adjust sugar quantities to balance the tartness of the rhubarb according to taste.
- Cold butter is essential for creating a crumbly topping texture; avoid melting the butter before mixing.
- This crisp can be stored in the refrigerator for up to 3 days and reheated before serving.

