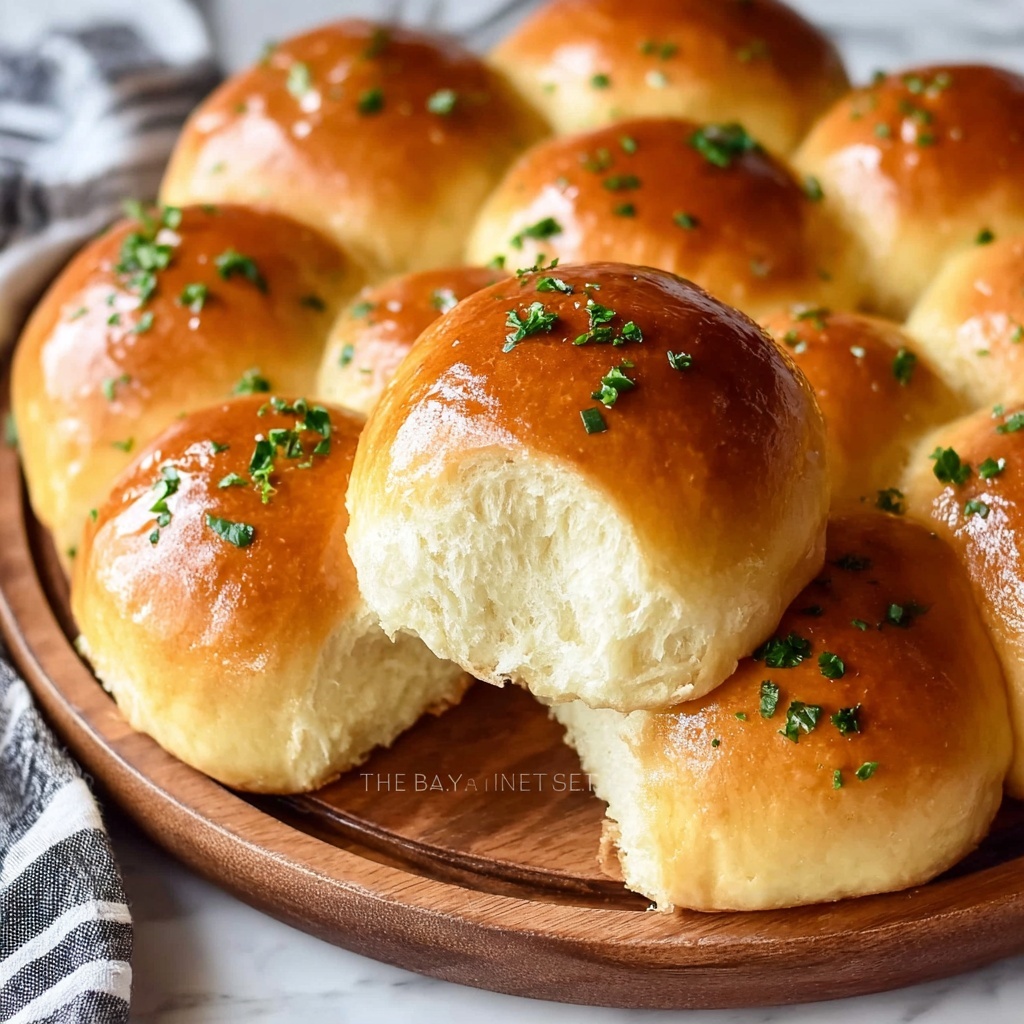
If you’re craving a warm, buttery treat that instantly lifts the mood at any dinner table, then you’re going to fall head over heels for this Easy Garlic Butter Dinner Rolls Recipe. These soft, pillowy rolls are infused with just the right amount of garlic butter glaze that makes every bite irresistibly flavorful. Whether it’s a weekday family meal or a festive gathering, these rolls are your new go-to for an easy, comforting side that everyone will rave about.
Ingredients You’ll Need
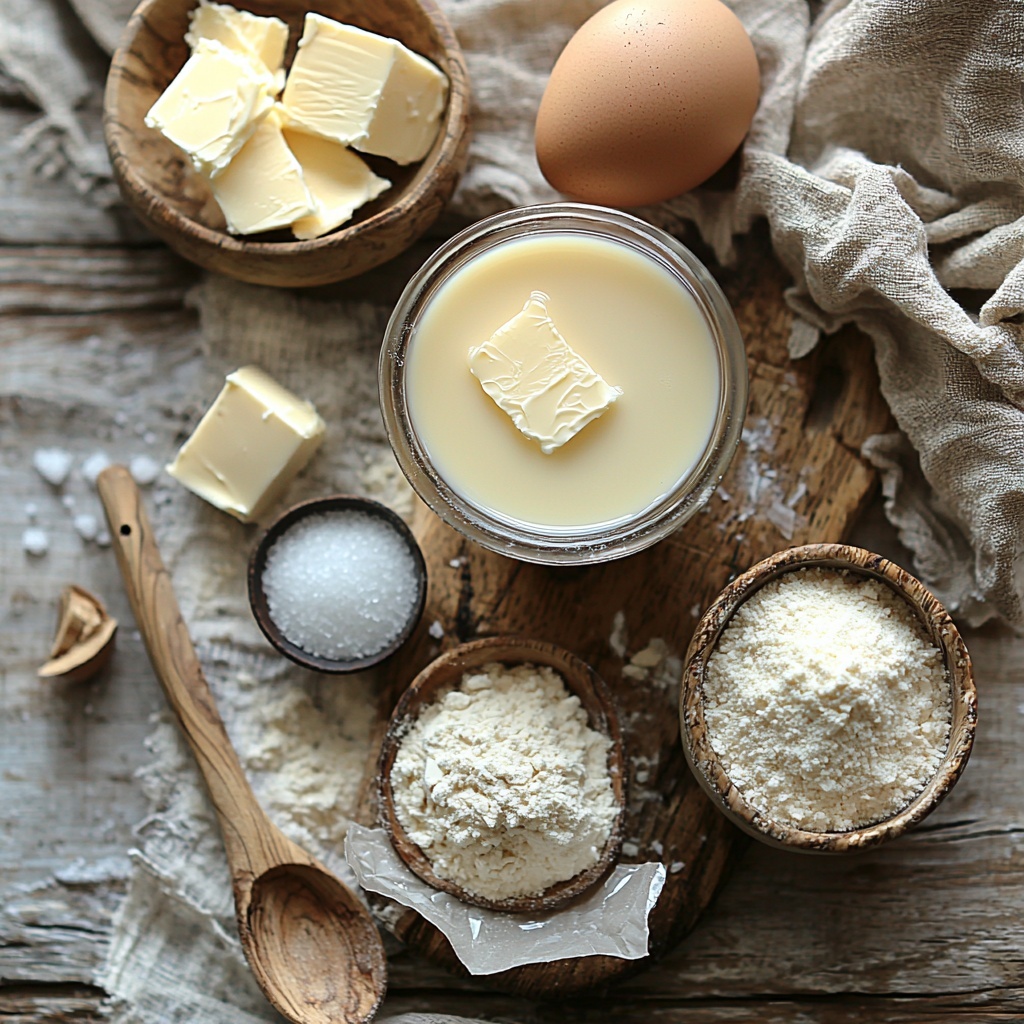
The beauty of this Easy Garlic Butter Dinner Rolls Recipe lies in its simplicity. Each ingredient is carefully chosen to contribute to the fluffy texture, rich flavor, and inviting golden color that make these rolls so delightful. Let’s break it down:
- 1 cup whole milk (240g), warm: Activates the yeast and hydrates the dough for softness and richness.
- 3 teaspoons active dry yeast: The magic agent that makes your rolls rise beautifully and become airy.
- 1/3 cup sugar (70g): Adds a subtle sweetness that balances perfectly with savory garlic butter.
- 3 3/4 cups all-purpose flour (490g): The main structure of the dough, giving body and tenderness.
- 1 large egg: Provides richness and helps with the dough’s stability and sheen.
- 1.5 teaspoons salt: Enhances all flavors and controls yeast activity for perfect rise.
- 6 tablespoons unsalted butter (85g), softened: Adds buttery flavor and tender crumb to each roll.
How to Make Easy Garlic Butter Dinner Rolls Recipe
Step 1: Activate the Yeast
Start by warming your milk to around 110°F — warm enough to awaken the yeast but not scald it. Stir in the active dry yeast and let it sit for about 5 minutes until frothy and bubbly. This step ensures your rolls will rise beautifully and have that perfect airy texture we love.
Step 2: Mix the Dough Ingredients
Next, combine the yeast mixture with sugar, flour, egg, salt, and softened butter right in the same bowl. Stir everything together until you have a shaggy dough. It might feel a little sticky at this stage, which means you’re on the right track to soft rolls.
Step 3: Knead Until Smooth
Turn your dough onto a lightly floured surface and knead vigorously for about 15 minutes. This effort pays off by developing the gluten, giving your rolls structure while keeping them tender and fluffy.
Step 4: First Rise
Transfer the dough to a lightly oiled bowl, cover it with cling wrap, and let it rise in a warm spot until it doubles in size, about 90 minutes. This rising time is key for that light, airy texture we crave in a perfect dinner roll.
Step 5: Shape the Rolls
Punch down your beautiful risen dough to release excess air. Divide it into 12 equal pieces, then gently shape each into a smooth ball. This shaping process is where you start to see those lovely rolls taking form.
Step 6: Second Rise
Arrange the dough balls on a parchment-lined baking sheet. Brush lightly with egg wash to give a lovely golden color when baked. Cover and let them rise again for 30 to 45 minutes. This final rise ensures that melt-in-your-mouth softness.
Step 7: Bake to Golden Perfection
Preheat your oven to 350°F. Bake the rolls for 20 to 22 minutes. You’ll know they’re done when each roll looks beautifully golden and smells like a fresh bakery treat. It’s practically impossible not to sneak a bite at this point!
Step 8: Brush with Garlic Butter
Once out of the oven, immediately brush the tops with melted garlic butter. This step is what transforms these simple rolls into a savory delight packed with that garlicky warmth we all adore. Don’t be shy with this step—it makes all the difference.
How to Serve Easy Garlic Butter Dinner Rolls Recipe
Garnishes
For a little extra flair, sprinkle freshly chopped parsley or chives over the warm garlic butter rolls. This not only adds a pop of color but also gives a fresh, herbaceous note that pairs wonderfully with the rich butter and garlic flavors.
Side Dishes
These rolls are a fantastic companion to soups, stews, and salads. Imagine dipping one into a hearty tomato soup or slathering it with butter alongside your roasted chicken dinner. They’re truly versatile and elevate any meal without stealing the spotlight.
Creative Ways to Present
Want to wow your guests? Arrange the rolls in a basket lined with a festive cloth napkin or serve them stacked on a wooden board with a side of herb-infused butter or hummus. For a fun twist, split the rolls and use them for mini sliders with your favorite fillings.
Make Ahead and Storage
Storing Leftovers
Leftover garlic butter dinner rolls are best kept in an airtight container or zip-top bag at room temperature for up to two days. This keeps them soft without drying out, so you can enjoy their fresh-baked goodness a little longer.
Freezing
If you want to keep these rolls for longer, freeze them after baking and cooling completely. Wrap each roll individually in plastic wrap and place in a freezer-safe bag. They’ll keep well for up to three months without losing their buttery charm.
Reheating
To bring your rolls back to life, thaw them at room temperature and then warm them in the oven at 300°F for 10 minutes. You can brush them again with a bit of melted garlic butter before serving to refresh that irresistible flavor.
FAQs
Can I use instant yeast instead of active dry yeast?
Yes! Instant yeast can be used as a substitute, but since it doesn’t require proofing, you can mix it directly with the dry ingredients. Just be sure to reduce the amount slightly and keep an eye on the rising times.
What if I don’t have whole milk?
You can substitute whole milk with 2% milk or even a non-dairy milk like almond milk. Just make sure the milk is warmed and not hot to keep the yeast happy and active during the dough preparation.
Can I add herbs or cheese to the dough?
Absolutely! Fresh herbs like rosemary or thyme, or a handful of shredded cheese, can be mixed into the dough before kneading. This adds extra layers of flavor to your Easy Garlic Butter Dinner Rolls Recipe.
How do I know when the rolls are fully baked?
Look for golden brown tops and a hollow sound when tapping the bottom of a roll. The internal temperature should be about 190°F if you want to be exact. The aroma of baked bread is also a great indicator that they are ready!
Can I make these rolls gluten-free?
While this recipe is designed for all-purpose flour, you can experiment with gluten-free flour blends formulated for bread baking. Keep in mind the texture and rise might differ, so some adjustments in hydration and kneading may be necessary.
Final Thoughts
There’s something truly special about the comforting aroma and taste of freshly baked garlic butter rolls, and this Easy Garlic Butter Dinner Rolls Recipe makes bringing that magic into your kitchen a breeze. Whether it’s your first time baking bread or you’re looking for a dependable crowd-pleaser, these rolls are bound to become a delicious staple in your home. So roll up your sleeves and get ready to impress your family and friends with a recipe that’s as fun to make as it is to eat!
Print
Easy Garlic Butter Dinner Rolls Recipe
- Prep Time: 20 minutes
- Cook Time: 22 minutes
- Total Time: 1 hour 52 minutes
- Yield: 12 rolls
- Category: Bread
- Method: Baking
- Cuisine: American
- Diet: Vegetarian
Description
These Easy Garlic Butter Dinner Rolls are soft, fluffy, and packed with rich garlic butter flavor. Perfect for complementing any meal or serving as a tasty snack, these homemade rolls are beginner-friendly and require only simple ingredients. The dough is kneaded by hand, allowed to rise twice for maximum fluffiness, then baked to a golden brown. Brushing with warm garlic butter after baking adds an irresistible savory touch.
Ingredients
Dough
- 1 cup whole milk (240g), warm (around 110°F)
- 3 teaspoons active dry yeast
- 1/3 cup sugar (70g)
- 3 3/4 cups all-purpose flour (490g)
- 1 large egg
- 1.5 teaspoons salt
- 6 tablespoons unsalted butter (85g), softened
Finishing
- 1 large egg (for egg wash)
- 3 tablespoons unsalted butter, melted
- 1–2 cloves garlic, minced (for garlic butter)
Instructions
- Activate Yeast: In a large bowl, combine the warm milk and active dry yeast. Let the mixture sit for about 5-10 minutes until it becomes frothy, indicating the yeast is active.
- Mix Dough Ingredients: Add the sugar, all-purpose flour, egg, salt, and softened butter to the yeast mixture. Stir until the ingredients form a shaggy dough.
- Knead Dough: Transfer the dough to a clean surface and knead by hand for about 15 minutes until the dough is smooth and elastic.
- First Rise: Place the dough in an oiled bowl and cover it with cling wrap. Let it rise in a warm place until it doubles in size, approximately 90 minutes.
- Shape Rolls: Punch down the risen dough to release air. Divide it into 12 equal pieces and shape each piece into a smooth ball.
- Second Rise: Arrange the dough balls on a baking sheet lined with parchment paper. Brush the tops with beaten egg (egg wash) and let them rise again for 30 to 45 minutes until puffy.
- Preheat Oven: While the rolls are undergoing their second rise, preheat your oven to 350°F (175°C).
- Bake Rolls: Bake the rolls in the preheated oven for 20 to 22 minutes until they turn a beautiful golden brown color.
- Apply Garlic Butter: As soon as the rolls come out of the oven, brush them generously with melted butter infused with minced garlic to give them a rich, savory finish.
Notes
- Ensure the milk is warm but not hot, around 110°F, to properly activate the yeast without killing it.
- Kneading by hand can be substituted with a stand mixer fitted with a dough hook for convenience.
- For garlic butter, gently warm the butter and mix in freshly minced garlic for best flavor.
- These rolls freeze well; wrap tightly and thaw before reheating in the oven to refresh.
- Using an egg wash helps create a shiny, golden crust on the rolls.
