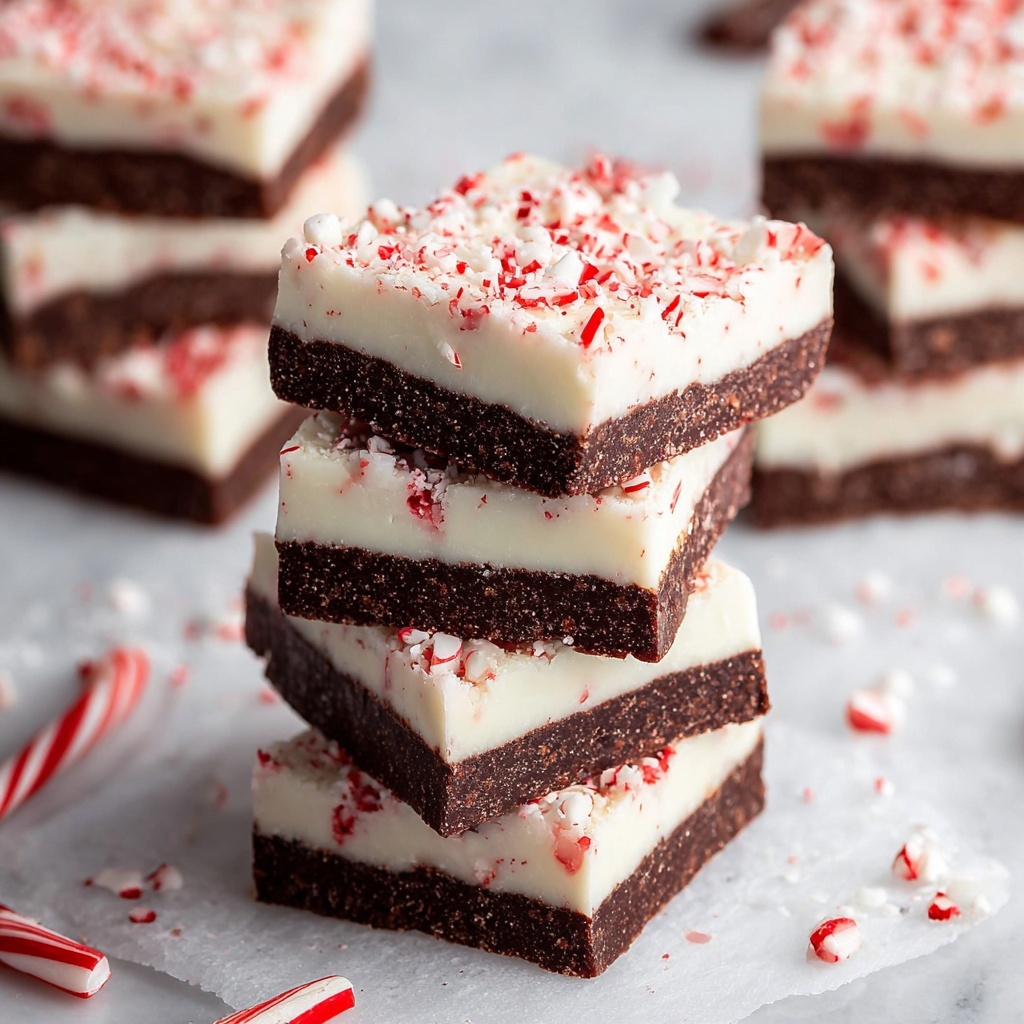
There is something truly magical about indulging in peppermint and chocolate together, and this Easy Peppermint Bark Recipe nails that festive flavor combination with such simplicity and flair. Imagine layers of rich dark chocolate paired perfectly with creamy white chocolate, each infused with refreshing peppermint and topped with crunchy crushed candy canes for that ideal balance of sweet and minty. Whether you’re gifting it during the holidays or sneaking a piece for yourself, this recipe brings joy and ease to your kitchen without any fuss. Trust me, once you try this Easy Peppermint Bark Recipe, it may quickly become your go-to treat whenever you want a taste of something special.
Ingredients You’ll Need
Creating this peppermint bark is as much about simplicity as it is about flavor. Each ingredient is chosen to bring out the best in taste, texture, and appearance, so you get layers of smooth chocolate with just the right crunch and peppermint zing.
- 8 oz dark chocolate (chopped): Use good quality chocolate for the best smooth, rich base with a subtle bitterness to balance the sweetness.
- 8 oz white chocolate (chopped): This brings creaminess and a showstopping bright contrast that pairs beautifully with the dark chocolate.
- ½ teaspoon neutral oil (¼ teaspoon per layer): Helps the chocolate melt to a glossy finish and prevents it from seizing, but you can skip this if your chocolate is high quality.
- ¼ teaspoon peppermint extract: Not mint or essential oil—this extract delivers the perfect cool, refreshing mint flavor emblematic of peppermint bark.
- 1 cup crushed candy canes (sifted): Separating fine peppermint dust from larger chunks gives you both flavor throughout and delightful crunchy bursts on top.
- Small pinch of fine sea salt: Adds depth and balances the sweetness in the dark chocolate layer for a more complex flavor profile.
How to Make Easy Peppermint Bark Recipe
Step 1: Prep Your Pan and Ingredients
Start by lining an 8×8-inch baking pan with parchment paper. Make sure to leave an overhang on the sides so you can easily lift the bark out later. Give the parchment a light spray of nonstick cooking spray, just enough to prevent sticking without interfering with chocolate texture. Have your chopped chocolates, peppermint extract, oil, salt, and crushed candy canes ready and within reach. Getting all your ingredients prepped sets the rhythm for a smooth, enjoyable making process.
Step 2: Melt and Flavor the Dark Chocolate
Melt the dark chocolate gently either over a double boiler or in short bursts in the microwave, stirring until silky smooth. Incorporate ¼ teaspoon of neutral oil for shine, half of your peppermint extract (just ⅛ teaspoon), a tablespoon or two of the fine peppermint dust for subtle speckles and flavor, and a pinch of fine sea salt to intensify the chocolate notes. Mixing these additions while the chocolate is warm ensures an even, harmonious peppermint layer loaded with flavor.
Step 3: Spread and Chill the Dark Chocolate Layer
Pour the flavored dark chocolate evenly into your prepared pan and spread it with a spatula so it’s smooth and level. Pop it into the fridge for 10–15 minutes, allowing it to set but remain slightly tacky on the surface. This tackiness is the secret to getting the white chocolate layer to adhere perfectly and not slide off later.
Step 4: Melt and Flavor the White Chocolate
Carefully melt your white chocolate, letting it cool to around 85–90°F so it’s warm but not hot—too hot and it can discolor or melt the dark layer prematurely. Stir in the remaining ¼ teaspoon of neutral oil and the last bit of peppermint extract. If you want a festive confetti effect, gently fold in 1–2 tablespoons of medium peppermint pieces here, but do it quickly or the white chocolate can turn slightly pink. This step is where the creamy, minty magic of the top layer happens.
Step 5: Layer the White Chocolate
Before spreading, if the dark layer feels too cold and rigid, let it rest at room temperature for 5 minutes so the layers bond well. Then, carefully and swiftly spread the white chocolate over the dark layer, trying not to disturb the base. This preserves the distinct layers that make peppermint bark so visually appealing and structurally satisfying.
Step 6: Decorate and Chill Until Firm
Sprinkle the remaining larger peppermint pieces evenly over the white chocolate and gently press them in so they stick without sinking. These final candy cane chunks add a playful crunch and festive look that will wow your friends and family. Chill the whole pan in the fridge for 30–60 minutes until the bark is fully firm and set for cutting.
Step 7: Cut and Store Properly
Use the parchment overhang to lift the set bark from the pan. Let it rest at room temperature for about 10 minutes before slicing. Using a warm, dry knife, cut the bark into squares, wiping the knife clean after each cut for neat, beautiful edges. Store your peppermint bark in an airtight container, preferably chilled, for up to two weeks to keep it fresh and crisp.
How to Serve Easy Peppermint Bark Recipe
Garnishes
To amp up the festive vibe when serving, add extra crushed candy canes on the side or mix in some edible silver glitter dust for shimmer. A sprig of fresh mint or a tiny candy cane on the plate can make your presentation feel extra special, elevating your peppermint bark into a showstopper.
Side Dishes
This Easy Peppermint Bark Recipe pairs wonderfully with a cozy cup of hot cocoa or a creamy latte. The warmth of the beverage complements the cool peppermint flavors while balancing the sweetness of the chocolate. For a special holiday brunch, serve alongside gingerbread cookies or spiced nuts for an irresistible variety of flavors.
Creative Ways to Present
Consider arranging peppermint bark pieces in a pretty bowl lined with festive paper for gifting or party tables. You could also stack the squares into layered jars or cellophane treat bags tied with colorful ribbons. For celebrations, cutting the bark into smaller bite-size pieces and serving on a holiday-themed platter makes sharing effortless and inviting.
Make Ahead and Storage
Storing Leftovers
If you have any leftovers (though it’s hard to resist eating it all!), keep the peppermint bark in an airtight container to protect it from moisture and odors. Store it in the fridge where it will maintain its crisp texture and peppermint freshness for up to two weeks. This way, you can enjoy it over time without any loss of quality.
Freezing
The good news is peppermint bark freezes beautifully. Wrap the bark tightly in plastic wrap and place it in a freezer-safe container or bag. When you’re ready to enjoy, thaw it in the refrigerator overnight to prevent condensation from melting the chocolate. Frozen peppermint bark is a fantastic option when you want to prepare gifts or holiday treats well in advance.
Reheating
Reheating peppermint bark isn’t usually recommended because it can melt and lose its crisp texture. However, if your bark becomes too firm, simply letting it come to room temperature for about 10–15 minutes before serving is best. Avoid any direct heat to preserve the signature layers and vibrant peppermint flavor that make it so beloved.
FAQs
Can I use peppermint oil instead of peppermint extract?
It’s best to stick with peppermint extract rather than peppermint oil or mint oil because peppermint oil can be much stronger and sometimes overpowering, or even cause irritation. The extract offers a balanced peppermint flavor that complements the chocolate perfectly.
What if I don’t have neutral oil? Can I skip it?
Absolutely! The neutral oil is mainly to help the chocolate melt smoothly and get a glossy finish. If you use high-quality chocolate, you can skip the oil altogether and still get amazing results. Just make sure to melt your chocolate gently and stir frequently.
Why do I need to use two kinds of peppermint candy pieces?
Separating the peppermint candy canes into fine dust and larger chunks adds texture and visual appeal. The dust gets mixed into the dark chocolate for a subtle peppermint flavor throughout, while the chunks on top give crunch and a festive, colorful topping.
How thick should I make each chocolate layer?
Aim for even layers about a quarter to half an inch thick. This thickness ensures you get distinct chocolate layers that hold up well when cutting and provide a balanced bite of dark and white chocolate each time.
Can I store peppermint bark at room temperature?
You can, but it’s not ideal. Room temperature might be fine for a day or two in a cool, dry place, but to maintain freshness and prevent melting or stickiness, refrigeration is recommended. Just bring it to room temperature before serving for the best texture.
Final Thoughts
I hope you’re as excited to dive into this Easy Peppermint Bark Recipe as I am to share it with you. It’s such a joyful and straightforward treat to make, perfect for spreading holiday cheer or just treating yourself to a festive snack any time of year. The layered flavors and textures truly sing together, and once you taste that perfect balance of cool peppermint and luscious chocolate, you might just find yourself coming back for seconds. Give it a try, and let this Easy Peppermint Bark Recipe become a treasured staple in your kitchen and holiday traditions.
Print
Easy Peppermint Bark Recipe
- Prep Time: 15 minutes
- Cook Time: 5 minutes
- Total Time: 20 minutes plus chilling time
- Yield: 16 pieces
- Category: Dessert
- Method: No-Cook
- Cuisine: American
Description
This Easy Peppermint Bark recipe features layers of rich dark and creamy white chocolate infused with peppermint extract and accented with crushed candy canes for a festive, crunchy treat. Perfect for holiday gifting or a delightful dessert, this no-bake bark is quick to prepare, requiring minimal ingredients and simple melting techniques, resulting in a beautifully layered chocolate confection with a refreshing peppermint twist.
Ingredients
Dark Chocolate Layer
- 8 oz dark chocolate, chopped
- ¼ teaspoon neutral oil (optional, for smoother melting)
- ⅛ teaspoon peppermint extract
- 1–2 tablespoons peppermint dust (fine crushed candy canes)
- Small pinch of fine sea salt
White Chocolate Layer
- 8 oz white chocolate, chopped
- ¼ teaspoon neutral oil (optional, for smoother melting)
- ⅛ teaspoon peppermint extract
- 1–2 tablespoons medium crushed peppermint candy pieces (optional, for confetti effect)
Decoration
- Remaining larger peppermint candy pieces for topping (about ¼ cup)
Instructions
- Prep: Line an 8×8-inch baking pan with parchment paper, leaving an overhang for easy lifting later. Lightly spray the parchment with nonstick cooking spray. Gather and measure all ingredients to prepare for assembly.
- Melt dark chocolate: Melt the dark chocolate gently using a double boiler or microwave in short intervals, stirring frequently to prevent burning. Stir in ¼ teaspoon neutral oil, half of the peppermint extract (⅛ teaspoon), 1–2 tablespoons peppermint dust, and a small pinch of fine sea salt until smooth.
- Assemble dark chocolate layer: Pour and spread the dark chocolate mixture evenly into the prepared pan. Place the pan in the refrigerator for 10–15 minutes to set the layer; it should be firm but slightly tacky to the touch.
- Melt white chocolate: Melt the white chocolate similarly, either in a double boiler or microwave, stirring often. Allow it to cool to about 85–90°F (warm but not hot), then stir in the remaining ¼ teaspoon neutral oil, the last ⅛ teaspoon peppermint extract, and optionally fold in 1–2 tablespoons medium peppermint pieces carefully to add a colorful confetti look without discoloring the chocolate.
- Assemble white chocolate layer: If the dark chocolate layer is too cold, rest it at room temperature for about 5 minutes to avoid separation. Spread the white chocolate gently and quickly over the dark layer to keep the layers distinct.
- Decorate & chill: Sprinkle the remaining larger peppermint candy pieces evenly over the top, pressing lightly so they stick into the white chocolate. Refrigerate for 30–60 minutes or until the bark is completely firm.
- Finish: Use the parchment overhang to lift the bark from the pan. Let it stand at room temperature for about 10 minutes before cutting. Use a warm, dry knife and wipe the blade clean after each cut for clean squares. Store the bark in an airtight container in the refrigerator for up to 2 weeks, best kept chilled.
Notes
- Use high-quality chocolate bars for the best flavor and texture; chips often contain stabilizers that affect melting.
- The neutral oil is optional; it helps achieve a smooth melt but is not required if using good chocolate.
- Melt chocolate gently to avoid scorching; use a double boiler or microwave carefully in short bursts.
- To avoid the white chocolate turning pink when adding peppermint pieces, fold them in quickly and do not overmix.
- Allow the bark to reach room temperature briefly before cutting to prevent cracking.
- Store peppermint bark in a cool, dry place or refrigerator to maintain freshness and texture.


