
If you’re craving that perfect balance of juicy chicken with a satisfyingly crunchy exterior, this Homemade Crispy Chicken Tenders Recipe is exactly what you need. It’s a delightful classic that turns simple chicken tenderloins into a golden, flavorful masterpiece. Crispy, tender, and bursting with just the right seasoning, these chicken tenders are a guaranteed crowd-pleaser whether it’s for a quick weeknight dinner or a casual gathering with friends.
Ingredients You’ll Need
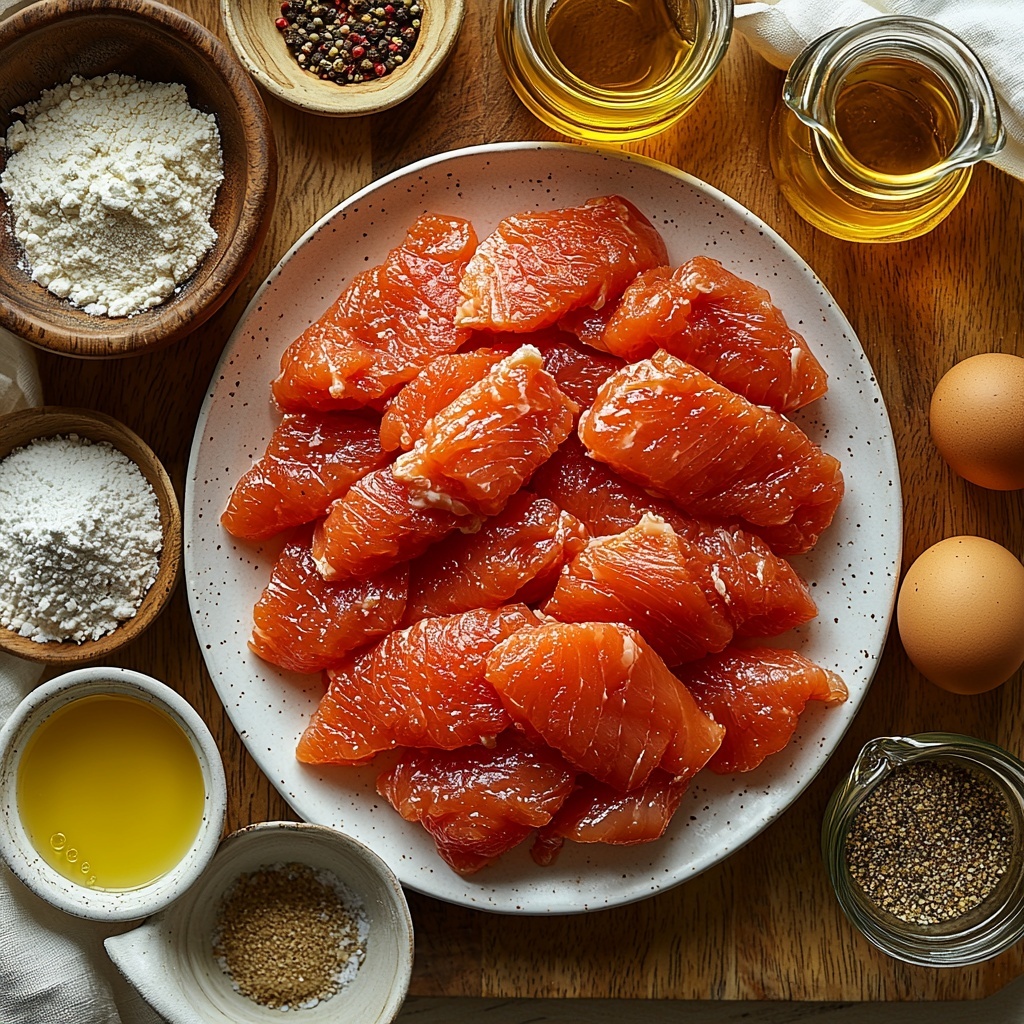
For this Homemade Crispy Chicken Tenders Recipe, the ingredients are refreshingly straightforward but each plays a vital role in creating that irresistible texture and vibrant flavor. From the sharp tang of buttermilk to the warmth of garlic powder, every element contributes to an unforgettable bite.
- Chicken tenderloins: Use fresh, high-quality tenders for the juiciest results.
- All-purpose flour: This forms the crispy shell that locks in moisture.
- Baking powder: Adds extra lightness and crispiness to the coating.
- Kosher salt: Enhances natural flavors without overpowering.
- Black pepper: Provides a subtle, spicy kick.
- Garlic powder: Infuses a rich, aromatic note to the breading.
- Buttermilk: Tenderizes the chicken and creates a tangy flavor that complements the spices.
- Large egg: Helps the coating stick perfectly to the tenderloins.
- Hot sauce: Adds a gentle heat and depth to the buttermilk marinade.
- Oil for frying: Choose a neutral oil with a high smoke point for crisp, even cooking.
How to Make Homemade Crispy Chicken Tenders Recipe
Step 1: Prepare the Coating and Marinade
Start by whisking together the flour, baking powder, salt, pepper, and garlic powder in one bowl—this dry mix is your flavor-packed coating. In another bowl, combine the buttermilk, egg, and hot sauce to create a tangy, spicy marinade that will keep the chicken moist and add a perfect punch of flavor.
Step 2: Heat the Oil
Pour about 3 inches of oil into a heavy-bottom skillet and heat it to around 325°F. Maintaining this temperature is key to getting that golden crust while ensuring your chicken cooks through without burning the breading.
Step 3: Double-Dip the Chicken
Take each tenderloin and give it a good dip in the flour mixture first. Then, dunk it in the buttermilk mixture before coating it again in the flour. This double-dip method creates an ultra-crispy, crunchy shell that locks in all the juiciness.
Step 4: Fry Until Golden and Cooked Through
Place the coated tenders carefully into the hot oil, frying them in batches so they don’t overcrowd or lose heat. Cook for 3 to 5 minutes per side until they reach a beautiful golden-brown color and an internal temperature of 165°F, signaling they’re perfectly cooked.
Step 5: Drain and Rest
Remove the tenders with a slotted spoon and let them drain on a wire rack rather than paper towels. This stops sogginess and keeps the coating crispy right up until you’re ready to serve.
How to Serve Homemade Crispy Chicken Tenders Recipe
Garnishes
Brighten up your chicken tenders with garnishes like freshly chopped parsley or a sprinkle of flaky sea salt. A squeeze of lemon can also add a vibrant freshness that complements the crispy coating beautifully.
Side Dishes
Pair your tenders with classic companions like crispy fries, creamy coleslaw, or a tangy honey mustard dip. For something a little different, try serving with a fresh garden salad or roasted veggies to balance the richness.
Creative Ways to Present
Want to elevate your Homemade Crispy Chicken Tenders Recipe? Serve them as sliders with soft buns and slaw or cut into strips for a fun chicken tender salad. They also make fantastic wraps with crunchy lettuce, tomatoes, and aioli for an easy handheld meal.
Make Ahead and Storage
Storing Leftovers
Your leftover chicken tenders keep best in an airtight container in the refrigerator for up to 3 days. To maintain crispiness, store them on paper towels to absorb excess moisture.
Freezing
If you want to make these tenders in advance, freeze uncooked but breaded pieces on a baking sheet first, then transfer them to a freezer-safe bag. They’ll stay fresh for up to 1 month and can be fried straight from frozen.
Reheating
Reheat your tenders in an oven set to 400°F for about 10 minutes. This method revives their crisp exterior without drying out the tender chicken inside, unlike microwaving which makes the breading soggy.
FAQs
Can I bake the Homemade Crispy Chicken Tenders Recipe instead of frying?
Absolutely! Baking is a great alternative for a lighter version. Just spray the tenders with oil and bake on a wire rack at 425°F for around 20 minutes, flipping halfway, until golden and cooked through.
What can I use instead of buttermilk?
If you don’t have buttermilk, simply mix 3/4 cup milk with 1 tablespoon of lemon juice or vinegar. Let it sit for 5 minutes, and it’ll give you the perfect acidic tang to tenderize your chicken.
How do I ensure my chicken tenders are crispy and not greasy?
Maintaining the oil temperature around 325°F is crucial. If the oil is too cool, the tenders absorb more oil and turn greasy. Also, draining on a wire rack prevents them from sitting in excess oil.
Can I use chicken breasts instead of tenderloins?
Yes! Slice chicken breasts into strips roughly the size of tenderloins, but be mindful they might take a tiny bit longer to cook through.
Is the hot sauce necessary in the recipe?
While not mandatory, the hot sauce adds a subtle heat and enhances overall flavor. You can adjust the amount or skip it if you prefer a milder taste.
Final Thoughts
Once you’ve tried this Homemade Crispy Chicken Tenders Recipe, it might just become your go-to comfort food. It’s effortless, delicious, and perfect for almost any occasion. So go ahead, gather those simple ingredients and treat yourself to a plate of golden, crispy goodness that never disappoints!
Print
Homemade Crispy Chicken Tenders Recipe
- Prep Time: 10 minutes
- Cook Time: 8 minutes
- Total Time: 18 minutes
- Yield: 4 servings
- Category: Main Course
- Method: Frying
- Cuisine: American
Description
Crispy, flavorful homemade chicken tenders made with a seasoned flour coating and buttermilk marinade, fried to golden perfection. Perfect for a quick weeknight dinner or a satisfying snack.
Ingredients
Chicken
- 1 lb chicken tenderloins
Breading
- 1 cup all-purpose flour
- 1 tsp baking powder
- 1/2 tsp kosher salt
- 1/2 tsp black pepper
- 1/2 tsp garlic powder
Wet Mixture
- 3/4 cup buttermilk
- 1 large egg
- 2 tsp hot sauce
Other
- Oil for frying (about 3 inches deep)
Instructions
- Prepare Breading and Marinade: In one bowl, mix together the flour, baking powder, kosher salt, black pepper, and garlic powder. In a separate bowl, whisk the buttermilk, egg, and hot sauce until fully combined.
- Heat Oil: Pour about 3 inches of oil into a heavy-bottom skillet and heat it to approximately 325°F, suitable for frying.
- Coat Chicken: Dredge each chicken tenderloin first in the flour mixture, then dip it into the buttermilk mixture. Return it to the flour mixture for a second coating to ensure a crispy crust.
- Fry Chicken Tenders: Carefully fry the chicken tenders in batches for about 3-5 minutes on each side, or until they turn golden brown and reach a safe internal temperature of 165°F.
- Drain and Serve: Remove the fried tenders and place them on a wire rack to drain excess oil before serving.
Notes
- Maintain oil temperature around 325°F to ensure crispy and evenly cooked tenders.
- Do not overcrowd the skillet while frying to prevent lowering the oil temperature.
- Use a wire rack to drain instead of paper towels to keep the coating crispy.
- Adjust hot sauce amount to your preferred spice level.
- Check internal temperature with a meat thermometer for food safety.
