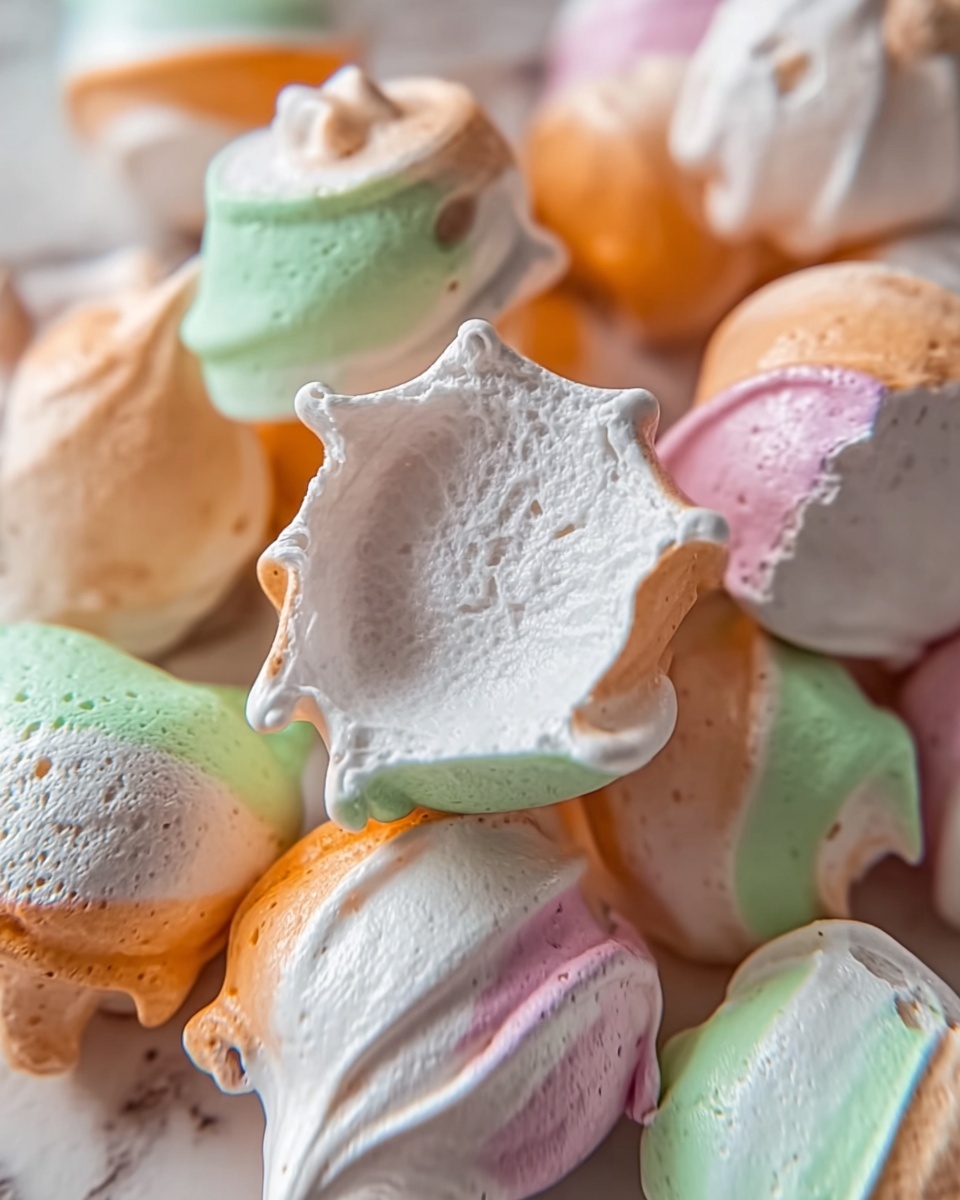
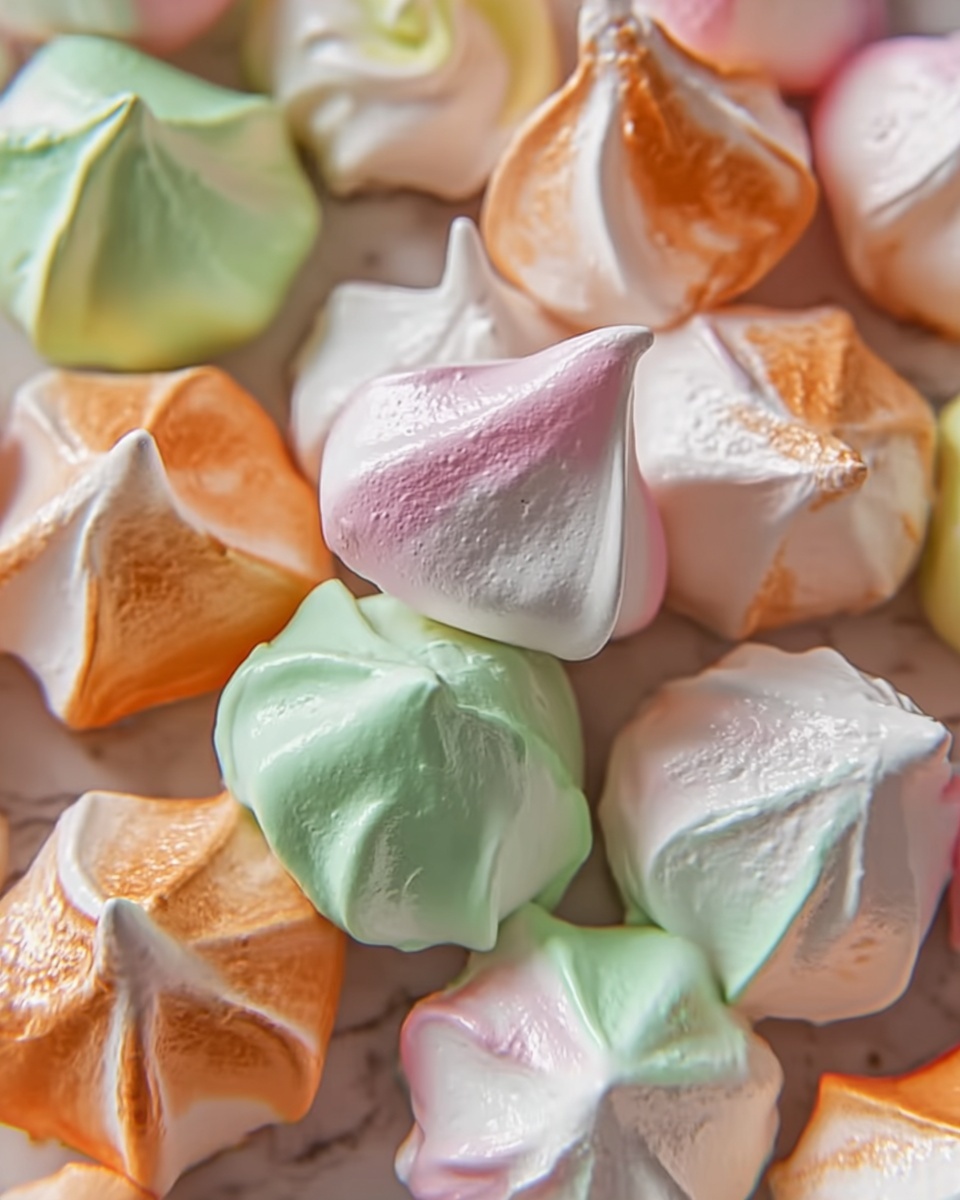
If you’ve ever enjoyed the nostalgic charm of chewy, colorful taffy from a boardwalk vendor, imagine capturing that magic right in your own kitchen with this Homemade Saltwater Taffy Rolls Recipe. This treat combines the perfect balance of sweet, buttery, and slightly salty flavors with a satisfyingly chewy texture that melts on your tongue. Making these delightful candies at home not only fills your space with a sweet, inviting aroma but also allows you to customize the flavors and colors to your heart’s desire. Whether you’re treating your family or preparing a special handmade gift, these taffy rolls are pure joy wrapped in wax paper.

Ingredients You’ll Need
Crafting the perfect batch of taffy starts with simple, everyday ingredients that come together to create that iconic taste and texture. Each plays an important role, from sweetness and chewiness to flavor and color, making this a straightforward but rewarding recipe.
- 2 cups granulated sugar: The foundation for sweetness and body in your taffy.
- 1 cup light corn syrup: Keeps the candy pliable and prevents crystallization for that chewy consistency.
- 1/4 cup water: Helps dissolve the sugar and corn syrup evenly, ensuring smooth cooking.
- 1/2 teaspoon salt: Balances the sweetness and enhances flavor depth.
- 1 tablespoon unsalted butter: Adds a rich, creamy undertone that softens the candy’s bite.
- 1/2 teaspoon vanilla extract: A classic flavor boost that rounds out the sweetness perfectly.
- 1/2 teaspoon flavored extracts: Strawberry, orange, or peppermint make wonderful flavor variations for fun, personalized rolls.
- 1/4 teaspoon food coloring (optional): Adds bright, eye-catching hues to match your flavor selection or festive theme.
- Cornstarch: For dusting surfaces, preventing sticking during the pulling and cutting process.
How to Make Homemade Saltwater Taffy Rolls Recipe
Step 1: Dissolve the Sugar Mixture
Begin by combining the sugar, corn syrup, water, and salt in a medium saucepan. Stir gently over medium heat until all the sugar crystals dissolve completely. This step lays the groundwork for a smooth, even texture in your candy, so take your time to ensure there are no grainy bits before moving forward.
Step 2: Boil to the Hard Ball Stage
Once dissolved, bring your mixture to a boil without stirring. This might feel a bit counterintuitive, but stirring now can cause crystallization. Keep boiling until the temperature hits 250°F on your candy thermometer, known as the hard ball stage, which guarantees your taffy will have that classic chewy quality.
Step 3: Add Butter, Extracts, and Color
Remove the pan from heat and quickly whisk in the butter, vanilla, and your chosen flavored extract. If you want a splash of color, add your food coloring now. This final flavoring step is your chance to infuse personality and vibrancy into every delicious bite.
Step 4: Pour and Cool the Mixture
Pour the hot candy carefully onto a heatproof surface dusted with cornstarch, like a marble countertop or a baking sheet. Allow it to cool until it’s just warm enough to handle comfortably without burning your fingers. This cooling period helps the taffy firm up enough to begin the fun part: pulling.
Step 5: Pull the Taffy
Butter your hands lightly to keep the taffy from sticking, then start stretching and folding it over repeatedly. This pulling process aerates the candy, making it lighter, chewier, and turning the color lighter as it incorporates air. Don’t rush—about 10 to 15 minutes of pulling is where the magic happens.
Step 6: Shape into Ropes
Roll the pulled taffy into a long rope roughly half an inch in diameter. This shape is ideal for cutting and wrapping, giving you those perfectly sized little bites of chewy delight that everyone loves.
Step 7: Cut and Wrap
Using kitchen scissors, cut your taffy rope into approximately one-inch pieces. Wrap each piece individually in wax paper or cellophane to prevent sticking and keep them fresh. These wrapped rolls are as pretty as they are tasty and make fantastic homemade gifts or party favors.
Step 8: Cool Completely and Enjoy
Allow the wrapped taffy to cool completely at room temperature before serving or storing. This final step ensures the candy sets perfectly to maintain its texture and flavor. Now, it’s time to indulge in your sweet, homemade treasure!
How to Serve Homemade Saltwater Taffy Rolls Recipe
Garnishes
While taffy is delicious on its own, you can elevate your presentation by placing your rolls in small decorative bowls filled with colorful shredded paper for a festive look. Sprinkling a little edible glitter on the wax paper or cellophane wrap adds a charming sparkle, perfect for celebrations.
Side Dishes
Taffy is a sweet treat meant to be savored slowly, so while it doesn’t pair with meals, it shines next to a cup of hot tea or coffee. The warmth of the drink contrasts beautifully with the chewy sweetness, making it an ideal post-dessert accompaniment.
Creative Ways to Present
Wrap your taffy rolls in themed wax papers for holidays or parties, or bundle them with ribbon for a delightful handmade gift. You can also arrange assorted flavored taffy in glass jars labeled with flavor names for a charming homemade candy buffet that’s sure to impress guests.
Make Ahead and Storage
Storing Leftovers
Store your homemade saltwater taffy rolls in an airtight container at room temperature to maintain their chewy texture. Avoid humidity and heat, as these can cause the candy to become sticky or melt. Properly stored, your taffy stays fresh for up to two weeks.
Freezing
While freezing taffy is possible, it’s generally not necessary. If you do freeze it, wrap each roll tightly to prevent moisture exposure, and thaw it completely at room temperature before unwrapping to avoid condensation that might affect texture.
Reheating
Taffy is best enjoyed as is, so reheating isn’t usually needed and can alter its chewy texture. If the candy feels too firm, simply let it sit at room temperature for a bit before eating to soften.
FAQs
Can I use substitutes for corn syrup in this Homemade Saltwater Taffy Rolls Recipe?
Corn syrup helps prevent crystallization and keeps taffy soft. Using substitutes like honey or glucose syrup may work but can change the texture and sweetness. For best results, stick with light corn syrup.
What is the best surface for pouring and pulling taffy?
A marble countertop or a baking sheet dusted with cornstarch works wonderfully. The cool, smooth surface helps the taffy cool evenly and the cornstarch prevents sticking during pulling and cutting.
How do I know when the taffy has reached the hard ball stage?
Use a candy thermometer and watch for 250°F as the indicator. If you don’t have one, test by dropping a bit of the mixture into cold water—if it forms a firm but pliable ball, it’s ready.
Can I make different flavors and colors in one batch?
Yes! After the initial boil and cooling, divide the taffy into smaller portions and add different extracts and coloring to each. Pull separately for varied flavor and color rolls.
How long does homemade saltwater taffy last?
When properly stored in an airtight container at room temperature, your homemade saltwater taffy rolls stay fresh for about two weeks, maintaining their chewy texture and vibrant flavors.
Final Thoughts
Making your own batch of Homemade Saltwater Taffy Rolls Recipe is such a rewarding experience, both for the senses and your soul. The combination of simple ingredients transformed through a bit of patience and love results in a nostalgic treat that’s sure to become a family favorite. I encourage you to roll up your sleeves, pick your favorite flavors, and dive into this sweet, chewy adventure—you won’t regret the delicious memories you create along the way!
Print
Homemade Saltwater Taffy Rolls Recipe
- Prep Time: 15 minutes
- Cook Time: 20 minutes
- Total Time: 35 minutes
- Yield: 24-30 taffy rolls
- Category: Candy
- Method: Stovetop
- Cuisine: American
Description
Homemade Saltwater Taffy Rolls are a classic chewy candy treat made by cooking a sugar syrup to the hard ball stage, then cooling and pulling the taffy until light and airy. This simple recipe lets you customize flavors and colors for a nostalgic, delightful candy experience perfect for sharing or gifting.
Ingredients
Primary Ingredients
- 2 cups granulated sugar
- 1 cup light corn syrup
- 1/4 cup water
- 1/2 teaspoon salt
- 1 tablespoon unsalted butter
- 1/2 teaspoon vanilla extract
Optional Flavoring and Coloring
- 1/2 teaspoon flavored extracts (such as strawberry, orange, or peppermint for variation)
- 1/4 teaspoon food coloring (optional)
For Finishing
- Cornstarch, for dusting
Instructions
- Combine Ingredients: In a medium saucepan, combine the granulated sugar, light corn syrup, water, and salt. Stir over medium heat until the sugar has completely dissolved to create a smooth syrup base.
- Cook to Hard Ball Stage: Allow the mixture to come to a boil without stirring and cook until it reaches 250°F (hard ball stage) on a candy thermometer, ensuring the candy will have the right chewy texture.
- Add Butter, Extracts, and Coloring: Remove the saucepan from heat and stir in the unsalted butter, vanilla extract, and any additional flavored extracts or food coloring to infuse flavor and color evenly throughout the candy.
- Pour and Cool: Carefully pour the hot candy mixture onto a heatproof surface dusted with cornstarch or onto a marble countertop. Let it cool just until it is safe to handle but still pliable.
- Pull the Taffy: Lightly butter your hands and stretch, fold, and pull the taffy continuously for 10-15 minutes until it becomes lighter in color and airy in texture, which gives saltwater taffy its signature chewiness.
- Shape into Rope: Roll the pulled taffy into a long rope about 1/2 inch in diameter to prepare for portioning.
- Cut and Wrap: Using kitchen scissors, cut the taffy rope into approximately 1 inch long pieces, then individually wrap each piece in wax paper or cellophane to prevent sticking and maintain freshness.
- Cool Completely: Allow the wrapped taffy pieces to cool fully before serving or storing to achieve the perfect chewy texture and flavor.
Notes
- Use a candy thermometer to ensure precise cooking temperature for optimal texture.
- If you don’t have a marble surface, a baking sheet lightly dusted with cornstarch works well for cooling.
- Butter your hands generously to prevent the taffy from sticking while pulling.
- Experiment with different flavored extracts and food coloring to create a variety of taffy flavors and appearances.
- Store the wrapped taffy in a cool, dry place to maintain freshness.
- Be cautious when handling hot sugar mixture as it can cause burns.

