
If you’ve ever wondered how to whip up something unbelievably delicious with just a few simple ingredients, you’re in for a treat with this Lemonade Scones with Cream and Jam Recipe. These scones are the perfect balance of light, fluffy, and sweet, made from scratch in no time at all. Using just self-raising flour, thickened cream, and lemonade, you’ll fall in love with how easy and rewarding it is to create fresh scones that are perfect for an afternoon tea or casual brunch. Trust me, once you try this Lemonade Scones with Cream and Jam Recipe, it’s going to become a go-to recipe you’ll want to share with everyone you know.

Ingredients You’ll Need
These few ingredients might seem simple, but each one plays a vital role in making your scones tender, fluffy, and perfectly flavored. From the richness of the cream to the gentle rise the lemonade brings, it’s a brilliant way to use pantry staples for a wonderful treat.
- Self-raising flour: Provides the perfect rise and soft texture without extra effort.
- Thickened cream: Adds richness and a slight tang, making the scones tender and moist.
- Lemonade: The secret ingredient that lightens the dough and lends a subtle sweetness.
- Whipped cream: For serving alongside the scones, adding light creaminess.
- Jam: Classic strawberry or raspberry jam pairs beautifully to complement the scones.
How to Make Lemonade Scones with Cream and Jam Recipe
Step 1: Prepare Your Oven and Baking Tray
Start by preheating your oven to 200°C (that’s 390°F or 180°C fan-forced). Line your baking tray with parchment paper to prevent sticking and to ensure even baking. This step sets you up for success right from the beginning.
Step 2: Mix the Dough
In a mixing bowl, combine the self-raising flour, thickened cream, and lemonade. Stir gently until most of the flour is incorporated. The key here is not to overdo it—you want the dough soft and slightly sticky, which helps keep the scones light rather than dense.
Step 3: Form the Dough
Lightly flour your work surface and turn the dough out. Knead just 3 to 5 times to bring it together—this gentle handling helps keep that tender crumb. Then pat the dough into a round disc about 2.5cm (1 inch) thick. This thickness ensures they bake perfectly through without being dry.
Step 4: Cut Out Your Scones
Using a 6cm (2.5 inch) round cutter, press straight down into the dough without twisting, which can seal the edges and prevent the scones from rising properly. Flour the cutter between each cut to keep things neat.
Step 5: Arrange on the Baking Tray
Carefully transfer your scones to the prepared tray, placing them close together so they support each other during baking. This is a simple trick to help them rise tall and fluffy.
Step 6: Lightly Brush the Tops
Brush the scones lightly with milk to give them a gorgeous golden shine once baked. It’s a small touch that makes a big difference to how inviting they look fresh from the oven.
Step 7: Bake to Golden Perfection
Bake your scones for about 15 minutes until they’re beautifully golden on top. Once out, place them on a wire rack to cool slightly, and cover with a tea towel to keep the tops soft and prevent crustiness—a true hallmark of a well-made scone.
Step 8: Serve with Cream and Jam
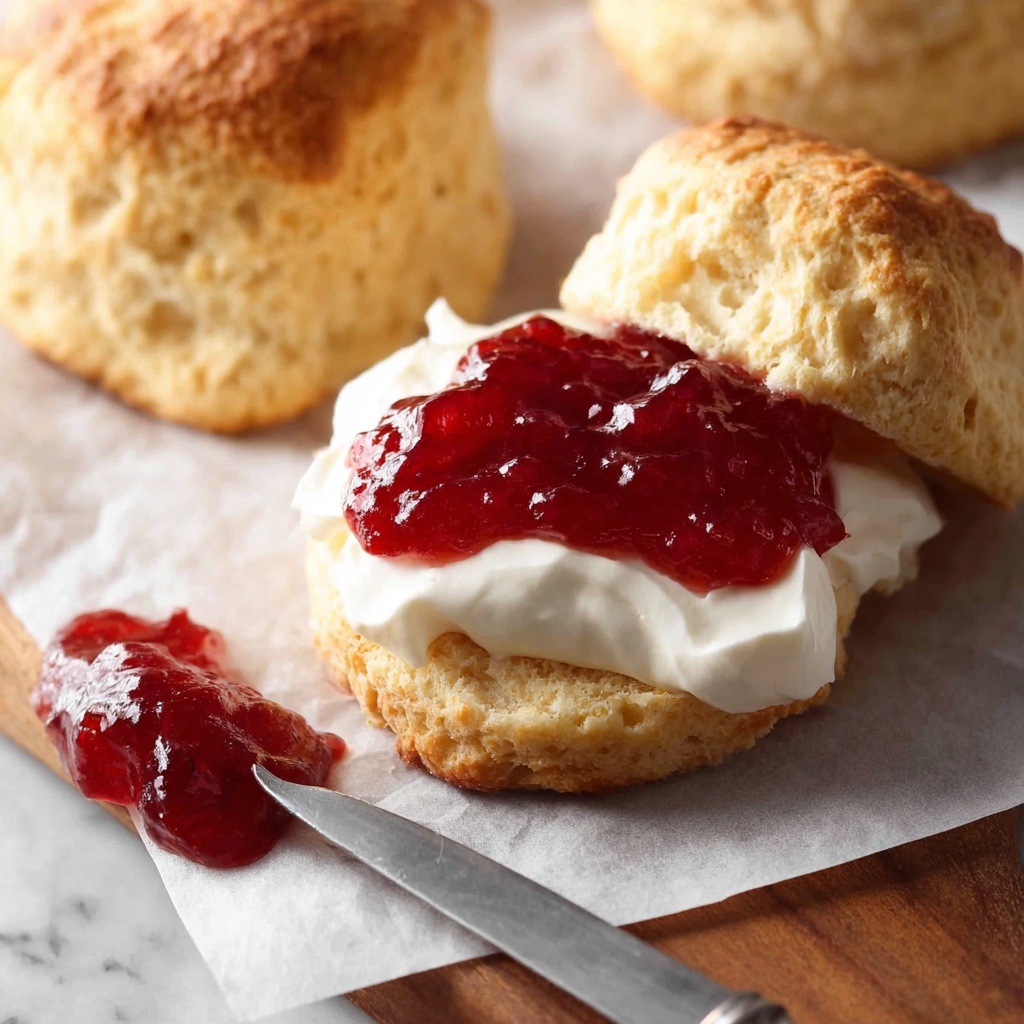
Your Lemonade Scones with Cream and Jam Recipe are now ready to enjoy! Serve them warm with generous dollops of whipped cream and your favorite jam. Don’t forget a hot pot of tea to complete this wonderfully comforting experience.
How to Serve Lemonade Scones with Cream and Jam Recipe
Garnishes
Fresh berries like strawberries or raspberries can add a pop of color and fresh flavor to your scones. A sprinkle of powdered sugar over the top also looks lovely and adds a touch of sweetness.
Side Dishes
Pair these scones with a light salad if you want to balance your tea or brunch, or offer some fresh fruit bowls alongside for a refreshing contrast. They’re surprisingly versatile!
Creative Ways to Present
Try stacking scones with jam and cream as mini scone sandwiches, or serve them on a tiered stand with different flavored jams and zesty lemon curd for an impressive afternoon tea spread.
Make Ahead and Storage
Storing Leftovers
If you have any leftovers, keep them in an airtight container at room temperature for up to 2 days. This helps retain their soft texture and delicious flavor without drying out.
Freezing
These scones freeze beautifully! Wrap each scone individually in cling film and pop them in a freezer bag. They can last up to 3 months frozen, making it easy to enjoy fresh scones anytime you want.
Reheating
To reheat, remove the cling film and warm the scones in a preheated oven at 180°C (350°F) for about 5 to 7 minutes. This refreshes their softness and brings back that freshly baked aroma.
FAQs
Can I use regular milk instead of thickened cream?
While you can substitute milk, thickened cream adds richness and moisture that milk alone can’t match, making the scones softer and more flavorful. If you want a lighter scone, milk may be okay, but there will be some trade-off in texture.
What type of lemonade is best for this recipe?
Use a clear, fizzy lemonade for the best rise and subtle sweetness. Avoid cloudy or heavily flavored lemonades, as they can alter the taste and texture unpredictably.
Can I make these scones gluten-free?
Yes! Use a gluten-free self-raising flour blend, but be mindful the texture may be slightly different. It’s best to choose a blend designed for baking to help keep them light and fluffy.
Do I need to chill the dough before cutting?
No chilling is required for this recipe. The quick method keeps things simple and efficient, and the scones bake beautifully straight after shaping.
How long do these scones stay fresh?
Freshly baked scones are best eaten the same day, but stored properly, they can stay nicely fresh for up to 2 days at room temperature. For longer freshness, freezing is your best bet.
Final Thoughts
I absolutely adore this Lemonade Scones with Cream and Jam Recipe because it takes just three simple ingredients and turns them into something magical. Whether it’s a last-minute tea party or a cozy weekend treat, these scones bring joy and a bit of homemade warmth to any table. Give it a try—you’re going to love how easily these scones come together and how wonderfully they taste every time.
Print
Lemonade Scones with Cream and Jam Recipe
- Prep Time: 10 minutes
- Cook Time: 15 minutes
- Total Time: 25 minutes
- Yield: 10 scones
- Category: Baked Goods
- Method: Baking
- Cuisine: British
Description
These Lemonade Scones are a delightfully simple and quick treat made with just three ingredients from scratch. Soft, fluffy, and lightly sweetened by the lemonade, these scones are perfect for tea time when served warm with whipped cream and jam. With minimal prep time and easy-to-follow steps, they are ideal for both beginner bakers and those craving a fresh homemade snack.
Ingredients
Dry Ingredients
- 3 1/2 cups self-raising flour, plus extra for dusting
Wet Ingredients
- 1 cup thickened cream (heavy cream, not whipped)
- 1 cup lemonade
To Serve
- Whipped cream
- Jam
Instructions
- Preheat Oven: Preheat your oven to 200°C (390°F), or 180°C (fan forced). Line a baking tray with baking or parchment paper to prevent sticking.
- Mix Dough: In a large bowl, combine the self-raising flour, thickened cream, and lemonade. Mix gently until the flour is mostly combined. Be careful not to over mix to avoid dense scones. The dough should be soft and fairly sticky.
- Knead Dough: Turn the dough out onto a lightly floured surface. Knead gently just 3 to 5 times to bring the dough together, then pat it into a round disc about 2.5 cm (1 inch) thick.
- Cut Shapes: Using a 6 cm (2.5 inch) round cutter, cut out rounds by pressing straight down without twisting. Flour the cutter between cuts to prevent sticking.
- Arrange on Tray: Use a knife or similar tool to carefully lift the cut dough rounds without touching the sides excessively. Place them on the prepared tray so they are slightly touching each other; this helps them rise evenly.
- Brush with Milk: Lightly brush the tops of the scones with a little milk to help them brown beautifully during baking.
- Bake: Bake the scones in the preheated oven for about 15 minutes, or until the tops are golden brown. Once baked, place them on a cooling rack and cover with a tea towel to keep the tops soft and prevent crustiness.
- Serve: Serve the warm scones generously spread with whipped cream and jam, alongside a cup of tea for a classic treat.
Notes
- You can substitute self-raising flour with plain flour plus 2 tsp baking powder per 3 1/2 cups if needed.
- Use a clear lemonade or lemon soda for a subtle citrus flavor that helps the scones rise and adds a touch of sweetness.
- Do not overwork the dough to maintain lightness; over mixing makes scones tough and dense.
- Press the cutter straight down instead of twisting to get clean edges and better rise.
- Brushing with milk helps the scones develop a lovely golden finish but can be omitted if desired.


