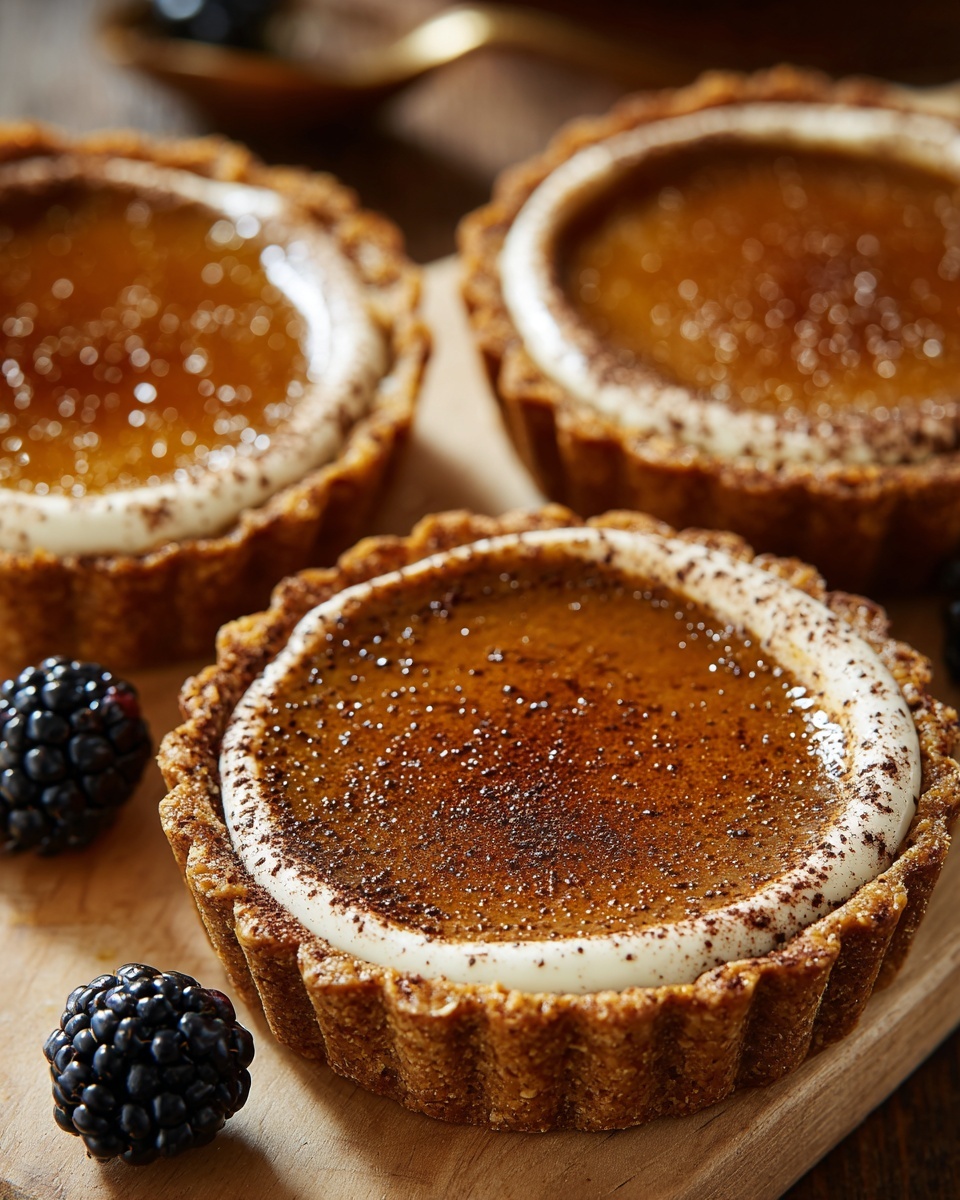
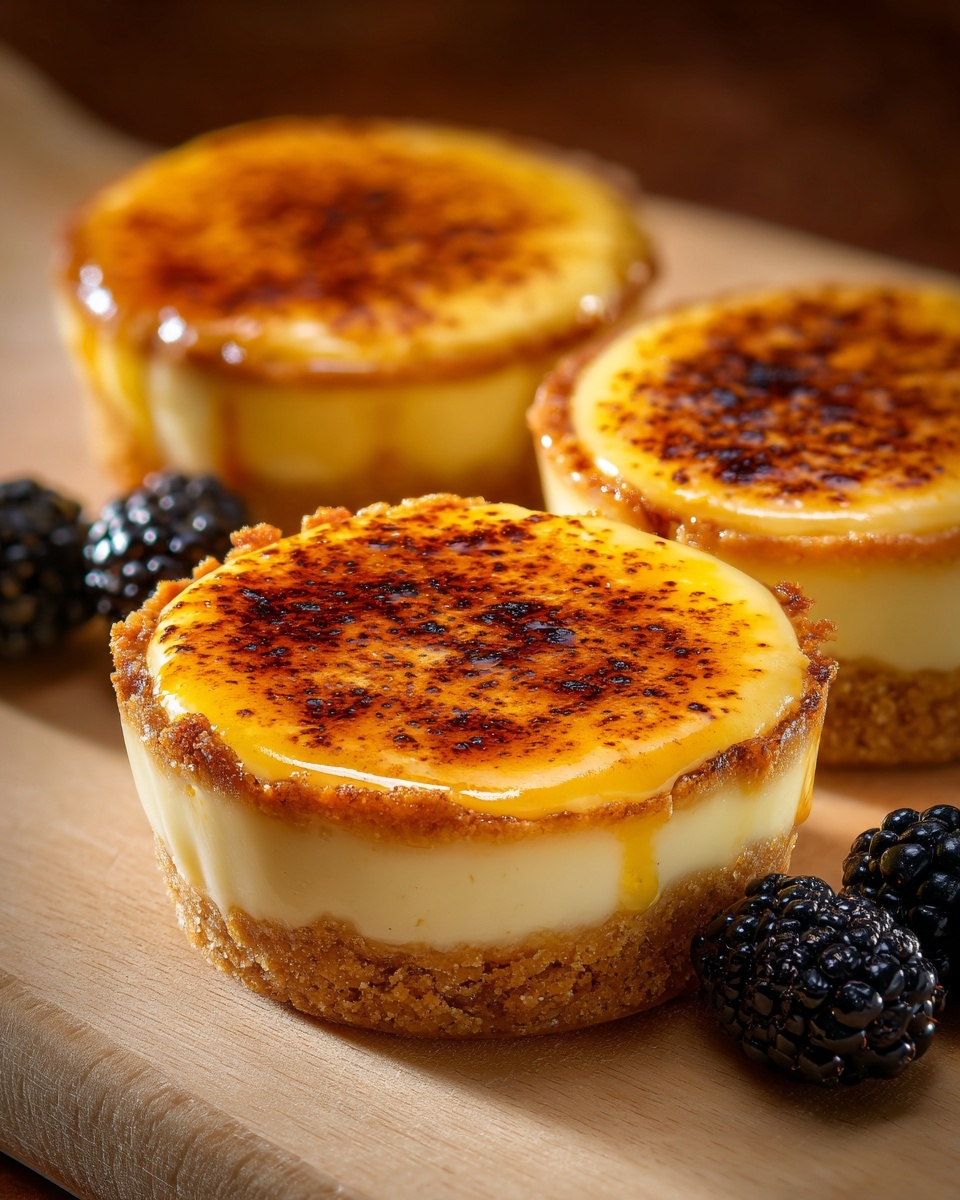
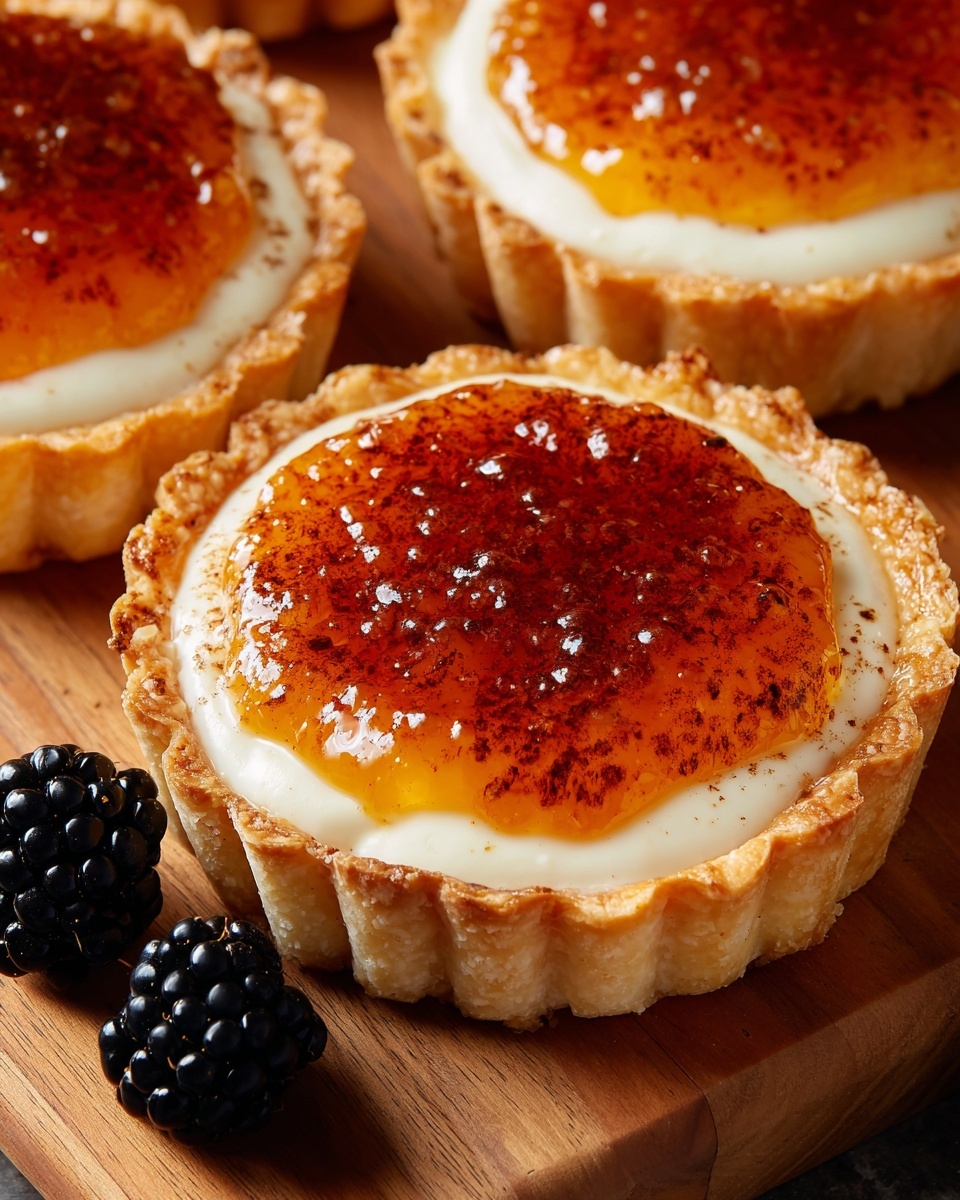
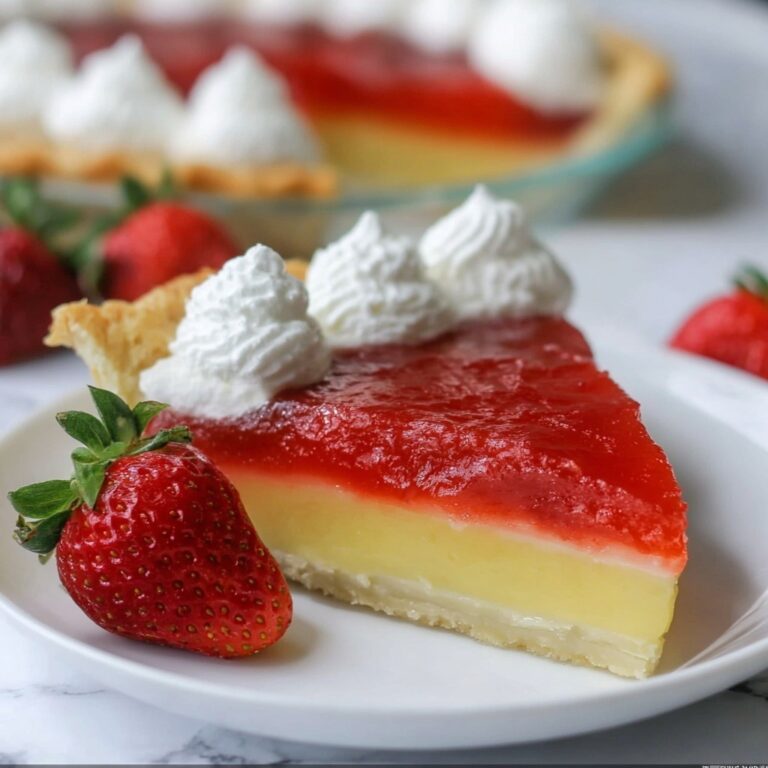
There is something utterly delightful about these charming little treats, and the Mini Milk Tart Tarts Recipe captures that magic perfectly. Imagine a crisp, buttery crust cradling a luscious, cinnamon-spiced custard filling that melts in your mouth with every bite. This South African classic, reimagined as bite-sized tarts, is a crowd-pleaser that’s as beautiful as it is delicious. Whether you’re hosting a party or craving a comforting sweet snack, these mini milk tarts bring warmth and joy wrapped up in one irresistible package.
Ingredients You’ll Need
This Mini Milk Tart Tarts Recipe calls for simple, pantry-friendly ingredients that come together in harmony to create the perfect balance of flavors and textures. Each one has a special role, from the flaky crust to that silky smooth filling that’s bursting with cinnamon goodness.
- All-purpose flour: The foundation for the tart crust, lending it structure and a tender crumb.
- Unsalted butter, cold and cubed: Adds richness and makes the crust irresistibly flaky.
- Powdered sugar: Sweetens the crust while ensuring a delicate texture.
- Egg yolk: Binds the dough together and helps create a golden crust.
- Ice-cold water: Used sparingly to bring the dough together without making it tough.
- Whole milk: The star of the filling, providing creaminess and body.
- Granulated sugar: Sweetens the custard filling perfectly without overpowering.
- Large eggs: Essential for thickening the custard to that luscious, silky consistency.
- Cornstarch: Works as a gentle thickener, ensuring the filling holds firm.
- Vanilla extract: Adds warmth and depth to the flavor profile.
- Ground cinnamon: The signature spice that makes this recipe so comforting and iconic.
- Salt: Enhances all the flavors and balances the sweetness.
- Unsalted butter (for the filling): Gives the custard a shiny finish and extra smoothness.
- Cinnamon sugar (optional): For that final sprinkle of nostalgic sweetness and crunch on top.
How to Make Mini Milk Tart Tarts Recipe
Step 1: Prepare the Oven and Pans
Start by preheating your oven to 350°F (175°C). Grease your mini tart pan or even a muffin tin with non-stick spray to make sure those adorable tarts pop out perfectly once baked.
Step 2: Make the Tart Crust
In a large bowl, combine the all-purpose flour and powdered sugar. Adding the cold cubed butter, use a pastry cutter or your fingertips to work it into the dry ingredients until the mixture resembles coarse crumbs. This mix mimics the buttery, flaky texture that makes the crust so satisfying.
Step 3: Bring the Dough Together
Stir in the egg yolk, which helps bind the dough. If the dough feels too crumbly or dry, add the ice-cold water one teaspoon at a time; this keeps the dough firm without becoming sticky, which is key to your crisp tart shells.
Step 4: Form the Tart Shells
Divide the dough evenly among your tart pan wells, pressing it into the bottoms and edges. This ensures sturdy, well-shaped shells ready to cradle that creamy filling. Chill the crusts in the fridge for 10 to 15 minutes to relax the dough and reduce shrinkage during baking.
Step 5: Blind Bake the Crusts
Bake the chilled tart shells for about 10 to 12 minutes, or until they turn a beautiful light golden color. Let them cool completely before filling to avoid sogginess and maintain that wonderful crunch.
Step 6: Warm the Milk
While the crusts bake, combine the milk, sugar, and salt in a saucepan over medium heat. Stir gently until the sugar dissolves and the milk warms up nicely—just don’t let it boil. This step infuses the milk with sweetness and prepares it for the custard.
Step 7: Whisk the Eggs and Cornstarch
In a separate bowl, whisk together eggs, cornstarch, and vanilla extract until completely smooth. This silky mixture will thicken to create the signature custard texture of your Mini Milk Tart Tarts Recipe.
Step 8: Temper the Eggs
Slowly pour a small amount of the warm milk into the egg mixture while whisking constantly. This prevents the eggs from scrambling and makes the custard smooth and creamy. Gradually add the rest of the milk, maintaining your whisking rhythm.
Step 9: Cook the Custard
Return the mixture to the saucepan and cook over medium heat, stirring continuously for about 5 to 7 minutes until it thickens gloriously. Remove from the heat and stir in the ground cinnamon and butter. This brings all those warm, comforting flavors together in one luscious custard.
Step 10: Fill the Tart Shells
Carefully spoon the cinnamon-infused custard into your cooled tart shells, smoothing the top with a spatula for a polished finish. This step is almost like painting your little masterpieces.
Step 11: Chill the Tarts
Let your Mini Milk Tart Tarts cool to room temperature before popping them into the fridge for at least an hour. This chilling time lets the custard set beautifully and makes them even more satisfying to bite into.
Step 12: Finishing Touches
Just before serving, sprinkle the tops with cinnamon sugar if you’re feeling extra indulgent. This adds a lovely crunch and enhances the nostalgic cinnamon flavor that makes this recipe truly special.
How to Serve Mini Milk Tart Tarts Recipe
Garnishes
Elevate your Mini Milk Tart Tarts with simple yet stunning garnishes like a light dusting of cinnamon sugar, a sprinkle of toasted coconut, or a few fresh berries for pops of color and freshness. These little details turn these comforting tarts into elegant bites that everyone will admire.
Side Dishes
While these mini tarts can stand alone as a delightful treat, pairing them with a dollop of whipped cream or a small scoop of vanilla ice cream takes your dessert game to the next level. For an afternoon tea, serve alongside a warm cup of rooibos or chamomile tea to complement the cinnamon and milk flavors perfectly.
Creative Ways to Present
Present your Mini Milk Tart Tarts Recipe on a pretty platter lined with doilies for a vintage vibe, or arrange them in mini cupcake liners to keep things neat and portable. For parties, consider a tiered dessert stand that shows off their delicate charm, making these little sweets the star of your table.
Make Ahead and Storage
Storing Leftovers
If you have any tarts left over (though they rarely last long!), store them in an airtight container in the refrigerator. This keeps the custard fresh and the crust crisp for up to 2 days. Just make sure they’re well covered to prevent them from absorbing other fridge odors.
Freezing
Freezing these tarts isn’t the best option as the custard filling may become grainy upon thawing, and the crust could lose its crispness. If you want to prepare in advance, consider freezing just the baked tart shells separately and filling them right before serving.
Reheating
Because these tarts are best served chilled, reheating isn’t recommended. However, if you prefer them slightly warmer, allow them to sit at room temperature for about 20 minutes before eating; this enhances the creamy texture without compromising the crust’s integrity.
FAQs
What makes this Mini Milk Tart Tarts Recipe different from a regular milk tart?
This recipe transforms the traditional South African milk tart into convenient, bite-sized tarts perfect for sharing at gatherings or enjoying as a single snack. The mini size makes them extra charming and easier to serve.
Can I use a store-bought pie crust instead of making my own?
While store-bought crusts can save time, making your own crust using the specified ingredients really brings out the buttery, tender qualities essential to the Mini Milk Tart Tarts Recipe’s authenticity and texture.
Is there a dairy-free alternative for the milk and butter?
Yes! You can substitute whole milk with plant-based alternatives like oat or almond milk, and use vegan butter in place of unsalted butter. Keep in mind the texture and flavor may vary slightly but will still be delicious.
Can I add other flavors to the custard filling?
Absolutely! While cinnamon is traditional, you can experiment with nutmeg, cardamom, or even a splash of citrus zest for a creative twist, just be sure to keep the delicate balance of sweetness intact.
How long do the Mini Milk Tart Tarts keep in the refrigerator?
They are best enjoyed within 2 days of making for optimal freshness, but can safely be stored for up to 3 days. After that, the crust may soften and the custard might lose its creamy appeal.
Final Thoughts
It truly warms my heart to share this Mini Milk Tart Tarts Recipe with you because it’s one of those recipes that brings a little bit of sweetness and nostalgia to any day. Making these mini milk tarts is straightforward, and the results are downright irresistible. So, gather your loved ones, whip up a batch, and enjoy the delightful flavors of this charming South African treat—one tiny tart at a time!
Print
Mini Milk Tart Tarts Recipe
- Prep Time: 30 minutes
- Cook Time: 20 minutes
- Total Time: 50 minutes
- Yield: 12 mini tarts
- Category: Dessert
- Method: Baking
- Cuisine: South African
Description
Mini Milk Tart Tarts are delightful bite-sized desserts featuring a crisp, buttery crust filled with a creamy, cinnamon-infused milk custard. These tarts are perfect for parties or a sweet treat anytime, combining the classic flavors of traditional South African milk tart in a convenient mini form.
Ingredients
For the crust:
- 1 1/2 cups all-purpose flour
- 1/2 cup unsalted butter, cold and cubed
- 1/4 cup powdered sugar
- 1 egg yolk
- 2 tablespoons ice-cold water (if needed)
For the filling:
- 2 cups whole milk
- 1/2 cup granulated sugar
- 2 large eggs
- 2 tablespoons cornstarch
- 1/2 teaspoon vanilla extract
- 1/4 teaspoon ground cinnamon
- 1/4 teaspoon salt
- 1 tablespoon unsalted butter
- Cinnamon sugar, for sprinkling on top (optional)
Instructions
- Preheat and Prepare Pans: Preheat the oven to 350°F (175°C). Grease a mini tart pan or a standard muffin tin with non-stick spray to prevent sticking.
- Make the Crust Base: In a large bowl, combine the flour and powdered sugar. Add cold cubed butter and use a pastry cutter or your fingers to blend until mixture resembles coarse crumbs.
- Form the Dough: Mix in the egg yolk and combine until a dough forms. If too dry, add ice-cold water teaspoon by teaspoon until dough is firm but not sticky.
- Shape Tart Shells: Divide the dough equally into the tart pan wells, pressing into bottoms and sides to create shells. Chill in the refrigerator for 10-15 minutes to set the dough.
- Bake the Crusts: Bake the chilled tart shells for 10-12 minutes until they turn lightly golden. Remove and set aside to cool.
- Warm Milk Mixture: In a medium saucepan, combine milk, sugar, and salt. Heat over medium heat stirring until sugar dissolves and milk is warm but not boiling.
- Prepare Egg Mixture: In a separate bowl, whisk together eggs, cornstarch, and vanilla extract until smooth.
- Temper the Eggs: Gradually whisk a small amount of warm milk into the egg mixture to prevent curdling. Slowly add remaining milk while stirring constantly.
- Cook the Custard: Transfer mixture back to saucepan and cook over medium heat, stirring continuously until thickened (about 5-7 minutes). Remove from heat and stir in cinnamon and butter until smooth.
- Fill Tart Shells: Pour the custard carefully into the cooled tart shells. Smooth the tops with a spatula.
- Chill Before Serving: Allow tarts to cool to room temperature, then refrigerate for at least 1 hour to set the custard.
- Garnish and Serve: Sprinkle with cinnamon sugar if desired for extra flavor and decoration. Serve chilled and enjoy your mini milk tart tarts!
Notes
- Use cold butter and ice-cold water to ensure a flaky biscuit-like crust.
- Tempering the eggs is essential to prevent curdling and create a smooth custard.
- Chilling the dough before baking helps maintain tart shape and prevents shrinking.
- Refrigerate thoroughly to let the custard set properly for clean slices.
- Optional cinnamon sugar sprinkle adds a nice extra touch but can be omitted.
- Store leftovers covered in the refrigerator and consume within 2-3 days for best freshness.


