
If you are looking for a deliciously versatile and crowd-pleasing breakfast or appetizer, this Mini Quiche Recipe (So Many Flavors!) Recipe is an absolute winner. Imagine bite-sized parcels of flaky pie crust filled with creamy egg custard, melty cheese, and your favorite mix-ins like crispy bacon, mushrooms, or vibrant bell peppers. This recipe lets you customize every batch to suit any taste bud, making it perfect for brunch gatherings, holiday parties, or even a simple weeknight snack. The best part is how easy these mini quiches are to make, yet how impressive they look and taste. Let me walk you through every step to make these little flavor bombs that everyone will love.
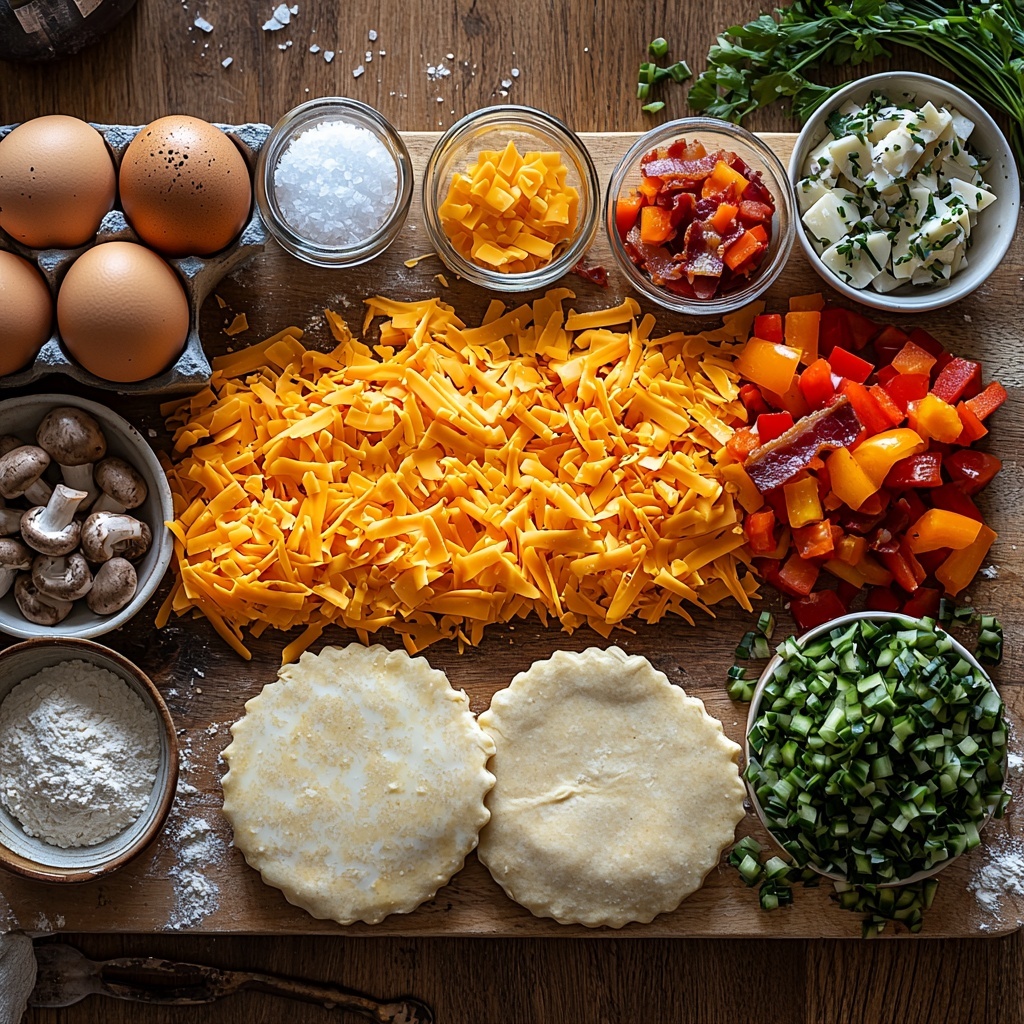
Ingredients You’ll Need
These ingredients are refreshingly straightforward but crucial for crafting the perfect texture and taste in your mini quiches. Each component plays a vital role, from the flakiness of the pie crust to the rich creaminess of the egg mixture and the flavorful punch of your chosen add-ins.
- 5 large eggs: The base for your creamy custard filling, eggs bind everything beautifully together.
- 1 cup milk or heavy cream: Adds richness and tenderness to the filling—cream will make it more decadent.
- ¾ teaspoon salt: Enhances all the flavors in the custard without overpowering them.
- ¼ teaspoon black pepper: Gives a gentle hint of spice and depth to each bite.
- ¼ teaspoon garlic powder: Adds a subtle savory note that complements most add-ins.
- 2 (7-ounce) pie crusts: Ready-made crusts save time and deliver that perfect crisp, flaky texture.
- ½ cup shredded cheddar cheese (or Swiss): Melts smoothly, providing gooey, cheesy pockets in every quiche.
- 1 cup add-ins (like bacon, mushrooms, bell peppers, chives, etc.): Customize your mini quiches with your favorite veggies, meats, or herbs for burst of flavor and color.
How to Make Mini Quiche Recipe (So Many Flavors!) Recipe
Step 1: Preheat and Prepare
Start by preheating your oven to 375°F. This ensures that the oven is fully heated when you’re ready to bake, helping your mini quiches achieve that beautifully golden crust and just-set filling that we all crave.
Step 2: Whisk the Egg Mixture
In a large bowl or a measuring cup with a spout, whisk together the eggs, milk (or cream), salt, pepper, and garlic powder until combined. This step is key to making the custard smooth and flavorful. Once mixed, place the filling in the refrigerator to chill while you prepare the crust, which helps the custard set nicely during baking.
Step 3: Cut and Line the Pie Crusts
Lightly flour a cutting board and roll out your pie crust dough until it’s at least 12 inches in diameter. Use a 2 ½-inch round cookie cutter to cut out circular pieces of dough—aim for about 24 rounds per pie crust. Don’t worry about re-rolling scraps 3-4 times; it’s part of the process! Carefully press each round into a well-greased mini muffin tin, ensuring the dough covers the bottom and sides thoroughly to create the perfect tiny crust cups.
Step 4: Add Filling and Add-Ins
Spoon about a teaspoon of your chosen add-ins into each crust cup, followed by a sprinkle of shredded cheese. Then, mix the remaining add-ins and cheese into your egg custard filling so the flavors are evenly spread. Pour the egg mixture gently into each crust, filling just shy of the top to prevent spills during baking.
Step 5: Bake Until Golden and Set
Pop your mini quiche tray into the preheated oven and bake for 20 to 22 minutes. Look for golden, flaky crust edges and an egg center that no longer jiggles when gently shaken. This signals perfectly cooked custard with that ideal creamy texture everyone loves. Once out of the oven, a little sprinkle of fresh herbs like chives or parsley adds a lovely fresh touch before serving.
How to Serve Mini Quiche Recipe (So Many Flavors!) Recipe
Garnishes
A garnish can elevate these mini delights from simple to spectacular. Fresh herbs such as thyme, chives, or parsley add a pop of green and a subtle burst of flavor that complements the richness of the quiche. A light dusting of smoked paprika or a drizzle of hot sauce also brings a wonderful finishing touch.
Side Dishes
Mini quiches pair beautifully with light, fresh sides to balance their richness. Think a crisp green salad with a tangy vinaigrette or a side of roasted cherry tomatoes. For brunch, fresh fruit or a colorful vegetable slaw bring brightness and contrast on the plate.
Creative Ways to Present
Turn your mini quiches into a stunning appetizer platter by arranging them on a rustic wooden board alongside bowls of dipping sauces like creamy mustard or herby sour cream. You can even serve them skewered with a small toothpick paired with pickled veggies for a fun party presentation that’s sure to impress your guests.
Make Ahead and Storage
Storing Leftovers
Once cooled, place leftover mini quiches in an airtight container and refrigerate for up to four days. This makes them perfect for quick breakfasts or snacks throughout the week without sacrificing flavor or texture.
Freezing
Mini quiches freeze wonderfully. Arrange them on a baking sheet in a single layer and freeze until solid. Then, transfer into freezer bags or containers. They’ll keep well for up to two months, letting you have ready-made bites whenever cravings strike.
Reheating
To reheat, thaw refrigerated or frozen mini quiches if frozen, then warm them in a 350°F oven for about 10 minutes until heated through and the crust is crisp again. Avoid microwaving if possible to keep that satisfying crunch intact.
FAQs
Can I use gluten-free pie crust for this recipe?
Absolutely! Gluten-free pie crusts work just as well and make this Mini Quiche Recipe (So Many Flavors!) Recipe accessible to those with dietary restrictions. Just be mindful of the crust’s fragility and handle gently.
What other cheeses can I use besides cheddar or Swiss?
Feel free to experiment with cheeses like feta, goat cheese, or mozzarella. Each adds its own unique flavor and texture, giving you endless opportunities to personalize your mini quiches.
How do I keep mini quiches from sticking to the pan?
Spray your mini muffin tin liberally with non-stick cooking spray before pressing in the dough. You can also lightly brush the molds with melted butter for an extra golden crust and easier removal.
Can I make these mini quiches dairy-free?
Yes, substitute regular milk or cream with unsweetened plant-based milks like almond or oat milk. Use dairy-free cheese alternatives if desired—your Mini Quiche Recipe (So Many Flavors!) Recipe will still be delicious and accommodating.
Is it better to use heavy cream or milk in the filling?
Heavy cream creates a richer, custard-like texture, while milk makes the filling lighter but slightly less creamy. Use whichever suits your preference or dietary needs without compromising the flavor.
Final Thoughts
This Mini Quiche Recipe (So Many Flavors!) Recipe is truly a versatile and delightful dish that can brighten any meal or celebration. Whether you stick to classic combinations or get adventurous with your add-ins, these little bites are sure to become a favorite. They’re easy to make, friendly for busy days, and full of comforting, cheesy goodness. I can’t wait for you to try making your own batch and share the joy with your family and friends!
Print
Mini Quiche Recipe (So Many Flavors!) Recipe
- Prep Time: 25 minutes
- Cook Time: 20 minutes
- Total Time: 45 minutes
- Yield: 48 mini quiches
- Category: Breakfast, Brunch, Appetizer
- Method: Baking
- Cuisine: American
- Diet: Low Lactose
Description
These Mini Quiches are delightful bite-sized treats perfect for brunch, parties, or a savory snack. Made with flaky pie crusts filled with a creamy egg mixture and your choice of flavorful add-ins like bacon, mushrooms, bell peppers, and cheese, they offer a versatile and delicious option that can be customized to suit any taste.
Ingredients
Egg Mixture
- 5 large eggs
- 1 cup milk (or heavy cream)
- ¾ teaspoon salt
- ¼ teaspoon black pepper
- ¼ teaspoon garlic powder
Crust and Fillings
- 2 (7-ounce) pie crusts
- ½ cup shredded cheddar cheese (or Swiss)
- 1 cup add-ins (bacon, mushrooms, bell peppers, chives, etc.)
Instructions
- Preheat the oven: Set your oven to 375°F (190°C) to ensure it reaches the perfect temperature for baking the mini quiches.
- Prepare the egg mixture: In a large bowl or measuring cup, whisk together the eggs, milk or heavy cream, salt, black pepper, and garlic powder until fully combined. Refrigerate this mixture until you’re ready to use it to keep it fresh and chilled.
- Prepare the pie crusts: On a lightly floured surface, roll out each pie crust until it measures about 12 inches in diameter. Using a 2½-inch round cookie cutter, cut out 24 circles from each crust sheet. You will need to re-roll the dough 3-4 times to get all the rounds. Press each circle firmly into the wells of a mini muffin tray that you’ve sprayed liberally with non-stick cooking spray, making sure to press the dough up the sides to fully line each cup.
- Add fillings and egg mixture: Distribute 1 teaspoon of your chosen add-ins and a sprinkle of shredded cheese evenly into each crust-lined muffin cup. Then pour the reserved egg mixture over the fillings, filling each cup just shy of the top. Use a small spoon to gently mix any remaining add-ins and cheese into the egg mixture before pouring to ensure even distribution.
- Bake the mini quiches: Place the mini muffin tray in the preheated oven and bake for 20-22 minutes. The quiches are done when the crust turns golden brown and the egg filling is set with no jiggle. Remove from oven and allow to cool slightly before serving garnished with fresh herbs if desired.
Notes
- You can customize the add-ins to your liking; popular choices include cooked bacon, sautéed mushrooms, diced bell peppers, and chopped chives.
- If you prefer a richer texture, substitute heavy cream for milk in the egg mixture.
- Make sure to spray the mini muffin pan liberally to prevent sticking and maintain the shape of the quiches.
- Leftover mini quiches can be stored in the refrigerator for up to 3 days and reheated in the oven or microwave.
- This recipe is ideal for making ahead and freezing; bake straight from frozen adding a few extra minutes to bake time.
